
Building a Microblog Using Node.js, Git and Markdown was peer reviewed by Mark Brown, Jani Hartikainen and Joan Yin. Thanks to all of SitePoint’s peer reviewers for making SitePoint content the best it can be!

The word micro gets thrown around a lot in modern programming: micro-frameworks, micro-services, etc. To me, this means solving the problem at hand with no bloat. All while solving for a clean-cut single concern. This means focusing on the problem at hand and cutting unnecessary dependencies.
I feel Node follows the Goldilocks principle when it comes to the web. The set of APIs you get from low-level libraries is useful for building micro websites. These APIs are not too complex, nor too simple, but just right for building web solutions.
In this article, let’s explore building a microblog with Node, Git, and a few dependencies. The purpose of this app will be to serve static content from files committed to a repository. You will learn how to build and test an app, and gain insight into the process of delivering a solution. By the end, you will have a minimalist working blog app that you can build on.
The Main Ingredients for a Microblog
To build an awesome blog, first, you need a few ingredients:
- A library to send HTTP messages
- A repository to store blog posts
- A unit test runner or library
- A Markdown parser
To send an HTTP message, I choose Node, as this gives me just what I need to send a hypertext message from a server. The two modules of particular interest are http and fs.
The http module will create a Node HTTP server. The fs module will read a file. Node has the library to build a micro-blog using HTTP.
To store a repository of blog posts, I’ll pick Git instead of a full-fledged database. The reason for this, Git is already a repository of text documents with version control. This is just what I need to store blog post data. Freedom from adding a database as a dependency frees me from coding for a ton of problems.
I choose to store blog posts in Markdown format and parse them using marked. This gives me freedom towards the progressive enhancement of raw content if I decide to do this later. Markdown is a nice, lightweight alternative to plain HTML.
For unit tests, I choose the excellent test runner called roast.it. I’ll pick this alternative because it has no dependencies and solves my unit test needs. You could pick another test runner like taper, but it has about eight dependencies. What I like about roast.it is that it has no dependencies.
With this list of ingredients, I have all the dependencies I need to build a micro-blog.
Picking dependencies is not a trivial matter. I think the key is anything that is outside the immediate problem can become a dependency. For example, I am not building a test runner nor a data repository, so that gets appended to the list. Any given dependency must not swallow the solution and hold the code hostage. So, it makes sense to pick out lightweight components only.
This article assumes some familiarity with Node, npm and Git, as well as with various testing methodologies. I won’t walk through every step involved in building the micro-blog, rather I’ll focus on and discuss specific areas of the code. If you’d like to follow along at home, the code is up on GitHub and you can try out each code snippet as it’s shown.
Testing
Testing gives you confidence in your code and tightens the feedback loop. A feedback loop in programming is the time it takes between writing any new code and running it. In any web solution, this means jumping through many layers to get any feedback. For example, a browser, a web server, and even a database. As complexity increases, this can mean minutes or even an hour to get feedback. With unit tests, we drop those layers and get fast feedback. This keeps the focus on the problem at hand.
I like to start any solution by writing a quick unit test. This gets me in the mindset of writing tests for any new code. This is how you’d get up and running with roast.it.
Inside the package.json file, add:
"scripts": {
  "test": "node test/test.js"
},
"devDependencies": {
  "roast.it": "1.0.4"
}
The test.js file is where you bring in all unit tests and run them. For example, one can do:
var roast = require('roast.it');

roast.it('Is array empty', function isArrayEmpty() {
  var mock = [];

  return mock.length === 0;
});

roast.run();
roast.exit();
To run the test do npm install && npm test. What makes me happy is I no longer need to jump through hoops to test new code. This is what testing is all about: a happy coder gaining confidence and staying focused on the solution.
As you can see, the test runner expects a call to roast.it(strNameOfTest, callbackWithTest). The return at the end of each test must resolve to true for the test to pass. In a real-world app, you wouldn’t want to write all tests in a single file. To get around this, you can require unit tests in Node and put them in a different file. If you have a look at test.js in the micro-blog, you’ll see this is exactly what I have done.
Tip: you run the tests using
npm run test. This can be abbreviated tonpm testor evennpm t.
The Skeleton
The micro-blog will respond to client requests using Node. One effective way of doing this is through the http.CreateServer() Node API. This can be seen in the following excerpt from app.js:
/* app.js */
var http = require('http');
var port = process.env.port || 1337;

var app = http.createServer(function requestListener(req, res) {
  res.writeHead(200, { 'Content-Type': 'text/plain; charset=utf-8'});
  res.end('A simple micro blog website with no frills nor nonsense.');
});

app.listen(port);

console.log('Listening on http://localhost:' + port);
Run this via an npm script in package.json:
"scripts": {
  "start": "node app.js"
}
Now, http://localhost:1337/ becomes the default route and responds with a message back to the client. The idea is to add more routes that return other responses, like responding with blog post content.
Folder Structure
To frame the structure of the app, I’ve decided on these main sections:
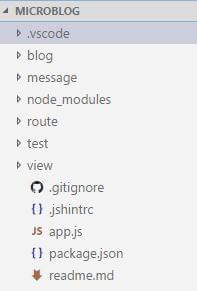
I’ll use these folders to organize the code. Here’s an overview of what each folder is for:
blog: stores raw blog posts in plain Markdownmessage: reusable modules to build response messages to the clientroute: routes beyond the default routetest: place to write unit testsview: place to put HTML templates
As previously mentioned, feel free to follow along, the code is up on GitHub. You can try out each code snippet as it’s shown.
More Routes with Tests
For the first use case, I’ll introduce a further route for blog posts. I choose to put this route in a testable component called BlogRoute. What I like is you can inject dependencies into this. Having this separation of concerns between the unit and its dependencies enables unit tests. Each dependency gets a mock in an isolated test. This allows you to write tests that are immutable, repeatable and fast.
The constructor, for example, looks like this:
/* route/blogRoute.js */
var BlogRoute = function BlogRoute(context) {
  this.req = context.req;
};
An effective unit test is:
/* test/blogRouteTest.js */
roast.it('Is valid blog route', function isValidBlogRoute() {
  var req = {
    method: 'GET',
    url: 'http://localhost/blog/a-simple-test'
  };

  var route = new BlogRoute({ req: req });

  return route.isValidRoute();
});
For now, BlogRoute expects a req object, this comes from the Node API. For the test to pass, it’s enough to do:
/* route/blogRoute.js */
BlogRoute.prototype.isValidRoute = function isValidRoute() {
  return this.req.method === 'GET' && this.req.url.indexOf('/blog/') >= 0;
};
With this we can wire it to the request pipeline. You can do something like this inside app.js:
/* app.js */
var message = require('./message/message');
var BlogRoute = require('./route/BlogRoute');
// Inside createServer requestListener callback...

  var blogRoute = new BlogRoute({ message: message, req: req, res: res });

  if (blogRoute.isValidRoute()) {
    blogRoute.route();
    return;
  }
// ...
The nice thing about having tests is I don’t have to worry about implementation details up front. I’ll define message soon. The res and req objects come from the http.createServer() Node API.
Feel free to go poke around the blog route, in route/blogRoute.js.
The Repository
The next problem to solve is reading raw blog post data inside BlogRoute.route(). Node offers a fs module you can use to read from the filesystem.
For example:
/* message/readTextFile.js */
var fs = require('fs');
var path = require('path');

function readTextFile(relativePath, fn) {
  var fullPath = path.join(__dirname, '../') + relativePath;

  fs.readFile(fullPath, 'utf-8', function fileRead(err, text) {
    fn(err, text);
  });
}
This code snippet is in message/readTextFile.js. At the heart of the solution, you read text files that are in the repository. Note fs.readFile() is an asynchronous operation. This is the reason it takes a fn callback and calls that with file data. This asynchronous solution uses a humble callback.
This provides for the file IO needs. What I like about it is it only solves for a single concern. Since this is a cross-cutting concern, such as reading a file, there is no need for unit tests. A unit test should only test your own code in isolation, not somebody else’s.
You could, in theory, mock the file system in memory and write unit tests this way, but the solution will then start leaking concerns everywhere and turn into mush.
A cross-cutting concern, such as reading a file is beyond the scope of your code. Reading a file, for example, depends on subsystems that are beyond your direct control. This makes tests brittle and adds time and complexity to the feedback loop. It is a concern that must be separate from your solution.
Inside the BlogRoute.route() function I can now do:
/* route/bogRoute.js */
BlogRoute.prototype.route = function route() {
  var url = this.req.url;
  var index = url.indexOf('/blog/') + 1;
  var path = url.slice(index) + '.md';

  this.message.readTextFile(path, function dummyTest(err, rawContent) {
    this.res.writeHead(200, { 'Content-Type': 'text/html; charset=utf-8' });
    this.res.end(rawContent);
  }.bind(this));
};
Note that message and res get injected through the BlogRoute constructor, as such:
this.message = context.message;
this.res = context.res;
Take the req object from the request, and read a Markdown file. Don’t worry about dummyTest(). For now, treat it like any other callback that handles the response.
To unit test this BlogRoute.route() function:
/* test/blogRouteTest.js */
roast.it('Read raw post with path', function readRawPostWithPath() {
  var messageMock = new MessageMock();
  var req = {
    url: 'http://localhost/blog/a-simple-test'
  };

  var route = new BlogRoute({ message: messageMock, req: req });

  route.route();

  return messageMock.readTextFileCalledWithPath === 'blog/a-simple-test.md' &&
    messageMock.hasCallback;
});
The message module gets injected into the BlogRoute to mock message.readTextFile(). With this, I can verify that the system under test (i.e. BlogRoute.route()) passes.
You wouldn’t want to require modules right in the code that needs them here. The reason is, you are hot gluing dependencies. This makes any kind of testing turn into full integration tests – message.readTextFile(), for example, will read an actual file.
This approach is called dependency inversion, one of the SOLID principles. This decouples software modules and enables dependency injection. The unit test builds on this principle with a mock dependency. messageMock.readTextFileCalledWithPath, for example, tests that this unit alone behaves as it should. It does not cross functional boundaries.
Do not be afraid of the mock. It’s a lightweight object used to test things. You could use sinon, for example, and add this dependency for mocks.
What I like are custom mocks, as this provides flexibility in handling many use cases. One advantage custom mocks provide is they declutter mocks from test code. This adds precision and clarity to unit tests.
All MessageMock does for now is:
/* test/mock/messageMock.js */
var MessageMock = function MessageMock() {
  this.readTextFileCalledWithPath = '';
  this.hasCallback = false;
};

MessageMock.prototype.readTextFile = function readTextFile(path, callback) {
  this.readTextFileCalledWithPath = path;

  if (typeof callback === 'function') {
    this.hasCallback = true;
  }
};
You can find this code in test/mock/messageMock.js.
Note the mock does not need to have any asynchronous behavior. In fact, it never even calls the callback. The purpose is to make sure it’s used in a way that fulfills the use case. Make sure message.readTextFile() gets called and has the proper path and callback.
The actual message object that gets injected into the BlogRoute comes from message/message.js. What it does is bring all reusable components into a single utility object.
For example:
/* message/message.js */
var readTextFile = require('./readTextFile');

module.exports = {
  readTextFile: readTextFile
};
This is an effective pattern you can use in Node. Name the file after the folder and export all components inside the folder from a single place.
At this point, the app is all wired up and ready to send back raw Markdown data. Time for an end to end test to verify this works.
Type npm start then, in a separate command line window, do curl -v http://localhost:1337/blog/my-first-post:
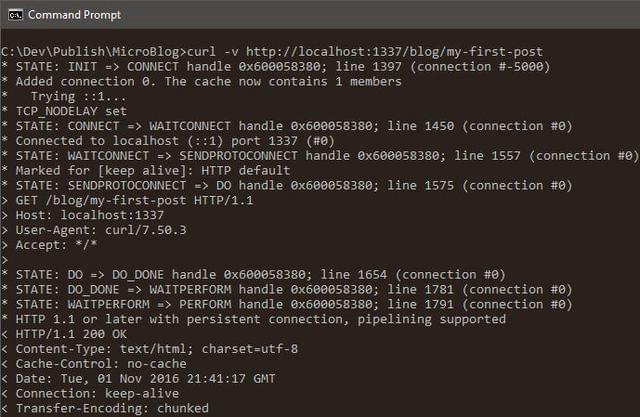
Post data gets into the repository through Git. You can persist blog post changes through git commit.
The Markdown Parser
For the next problem, time to turn the raw Markdown data from the repository into HTML. There are two steps to this process:
- Grab an HTML template from the
viewfolder - Parse Markdown into HTML and fill the template
In sound programming, the idea is to take a large problem and break it into small bite-size pieces. Let’s solve the first problem: how do I get the HTML template based on what I have in BlogRoute?
One approach could be:
/* route/blogRoute.js */
BlogRoute.prototype.readPostHtmlView = function readPostHtmlView(err, rawContent) {
  if (err) {
    this.res.writeHead(404, { 'Content-Type': 'text/plain; charset=utf-8' });
    this.res.end('Post not found.');
    return;
  }

  this.rawContent = rawContent;
  this.message.readTextFile('view/blogPost.html', this.renderPost.bind(this));
};
Remember, this replaces the dummy callback used in the previous section, called dummyTest.
To replace the callback dummyTest, do:
this.message.readTextFile(path, this.readPostHtmlView.bind(this));
Time to write a quick unit test:
/* test/blogRouteTest.js */
roast.it('Read post view with path', function readPostViewWithPath() {
  var messageMock = new MessageMock();
  var rawContent = 'content';

  var route = new BlogRoute({ message: messageMock });

  route.readPostHtmlView(null, rawContent);

  return messageMock.readTextFileCalledWithPath !== '' &&
   route.rawContent === rawContent &&
   messageMock.hasCallback;
});
I’ve only tested for the happy path here. There is yet another test in case it can’t find the blog post. All BlogRoute unit tests are under test/blogRouteTest. Feel free to poke around in there, if interested.
At this point, you have passing tests! Even though it is impossible to verify the entire request pipeline, you have enough confidence to keep on going. Again, this what testing is all about: staying in the zone, focused, and being happy. There is no reason to be sad or frustrated while programming. I certainly think you should be happy rather than sad.
Note the instance stores raw Markdown post data in this.rawContent. There is more work afoot, and you can see that in the next callback (i.e. this.renderPost()).
In case you are not familiar with .bind(this), in JavaScript this an effective way to scope callback functions. By default, a callback gets scoped to the outer scope, which is no good in this case.
Parsing Markdown into HTML
The next bite-size problem is to take the HTML template and raw content data and bring it all together. I’ll do this in BlogRoute.renderPost() which we used as a callback above.
Here’s one possible implementation:
/* route/blogRoute.js */
BlogRoute.prototype.renderPost = function renderPost(err, html) {
  if (err) {
    this.res.writeHead(500, { 'Content-Type': 'text/plain; charset=utf-8' });
    this.res.end('Internal error.');
    return;
  }

  var htmlContent = this.message.marked(this.rawContent);
  var responseContent = this.message.mustacheTemplate(html, { postContent: htmlContent });

  this.res.writeHead(200, { 'Content-Type': 'text/html; charset=utf-8' });
  this.res.end(responseContent);
};
Again, I’ll test the happy path:
/* test/blogRouteTest.js */
roast.it('Respond with full post', function respondWithFullPost() {
  var messageMock = new MessageMock();
  var responseMock = new ResponseMock();

  var route = new BlogRoute({ message: messageMock, res: responseMock });

  route.renderPost(null, '');

  return responseMock.result.indexOf('200') >= 0;
});
You may be wondering where responseMock comes from. Remember, mocks are lightweight objects used to test things. Use the ResponseMock to make sure res.writeHead() and res.end() get called.
In this mock, here’s what I put:
/* test/mock/responseMock.js */
var Response = function Response() {
  this.result = '';
};

Response.prototype.writeHead = function writeHead(returnCode) {
  this.result += returnCode + ';';
};

Response.prototype.end = function end(body) {
  this.result += body;
};
This response mock will do if it raises the level of confidence. As far as confidence goes, it is subjective to the author. Unit tests tell you what the person who wrote the code was thinking. This adds clarity to your programs.
The code is here: test/mock/responseMock.js.
Since I introduced message.marked() (to convert Markdown to HTML) and message.mustacheTemplate() (a lightweight templating function), I can mock those.
They get appended to MessageMock:
/* test/mock/messageMock.js */
MessageMock.prototype.marked = function marked() {
  return '';
};

MessageMock.prototype.mustacheTemplate = function mustacheTemplate() {
  return '';
};
At this point, it doesn’t matter what content each component returns. My main concern is to make sure both are part of the mock.
What is nice about having awesome mocks, is you can iterate and make them better. As you find bugs, you can beef up unit tests and add more use cases to the feedback loop.
With this, you get passing tests. Time to wire this up to the request pipeline.
In message/message.js do:
/* message/message.js */
var mustacheTemplate = require('./mustacheTemplate');
var marked = require('marked');
// ...

module.exports = {
  mustacheTemplate: mustacheTemplate,
// ...
  marked: marked
};
marked is the Markdown parser I chose to add as a dependency.
Add it to package.json:
"dependencies": {
  "marked": "0.3.6"
}
mustacheTemplate is a reusable component inside the message folder, located in message/mustacheTemplate.js. I decided to not add this as another dependency as, given the list of features I need, it seemed like overkill.
At the crux of the mustache template function is this:
/* message/mustacheTemplate.js */
function mustache(text, data) {
  var result = text;

  for (var prop in data) {
    if (data.hasOwnProperty(prop)) {
      var regExp = new RegExp('{{' + prop + '}}', 'g');

      result = result.replace(regExp, data[prop]);
    }
  }

  return result;
}
There are unit tests to verify this works. Feel free to poke around those too: test/mustacheTemplateTest.js.
You still need to add an HTML template or view. Within view/blogPost.html do something like:
<!-- view/blogPost.html -->
<body>
  <div>
    {{postContent}}
  </div>
</body>
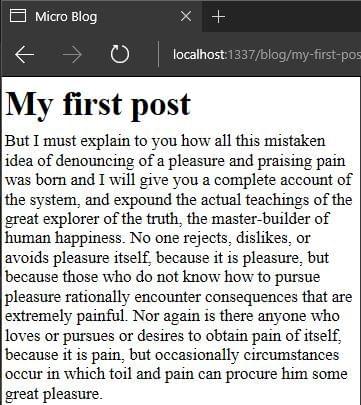
With this in place, it’s time to demo inside a browser.
To try it, type npm start then go to http://localhost:1337/blog/my-first-post:
Never lose sight of modular, testable and reusable components in software. In fact, don’t let anyone talk you into a solution that is hostile to this. Any codebase can have clean code, even when tightly coupled to a framework, so don’t lose hope!
Looking Forward
That just about gives you a working app. There are many possibilities from this point to get it production ready.
Some examples of possible improvements include:
- Git deployments, for example, use GitFlow
- Adding a way to manage client side resources
- Basic caching, both of client side and server side content
- Adding metadata (perhaps using front matter) to make posts SEO-friendly
There are no limits, and in your world you can take this app as far as you want.
Wrap-Up
I hope you see how you can build solutions in Node.js with just a few lightweight dependencies. All you need is a little imagination and a focus on the problem at hand. The set of APIs at your disposal are enough to build some amazing things.
It is nice to see just how important the KISS principle is to any solution. Solving for the immediate problem only, and keeping complexity as low as possible.
This working solution adds up to around 172KB on disk with dependencies. A solution this size will have incredible performance on just about any web host. A responsive and lightweight app will make users happy. The best part is, you now have a nice microblog to play with and take even further.
I’d love to read your comments and questions on the approach and hear what you think!