
//

//

//
With this article, we are launching a series of posts targeting developers who want to learn or refresh their knowledge about writing concurrent applications in general. The series will focus on well-known and widely adopted concurrency patterns in different programming languages, platforms, and runtimes.
In the first episode of this series, we’ll start from the ground up: The OS level schedules our application’s I/O, so it’s essential to understand the principles.
Concurrent code has a bad reputation of being notoriously easy to screw up. One of the world's most infamous software disasters was caused by a race condition. A programmer error in the Therac-25 radiation therapy device resulted in the death of four people.
Data races are not the only problem, though: inefficient locking, starvation, and a myriad of other problems rise. I remember from university that even the seemingly trivial, innocent-looking task of writing a thread-safe singleton proved to be quite challenging because of these nuances.
No wonder that throughout the past decades' many concurrency-related patterns emerged to abstract away the complexity and snip the possibilities of errors. Some have arisen as a straightforward consequence of the properties of an application area, like event loops and dispatchers in window managers, GUI toolkits, and browsers; where others succeeded in creating more general approaches applicable to a broad range of use cases, like Erlang's actor system.
My experience is that after a brief learning period, most developers can write highly concurrent, good quality code in Node.js, which is also free from race conditions. Although nothing is stopping us from creating data races, this is far less frequently happening than in programming languages or platforms that expose threads, locks and shared memory as their main concurrency abstraction. I think it's mainly due to the more functional style of creating a data flow (e.g. promises) instead of imperatively synchronizing (e.g. with locks) concurrent computations.
However to reason about the "whats and whys," it is best to start from the ground up, which I think is the OS level. It's the OS that does the hard work of scheduling our applications and interleaving it with I/O, so it is essential that we understand the principles. Then we discuss concurrency primitives and patterns and finally arrive at frameworks.
Let the journey begin!
Before diving into the OS level details, let's take a second clarifying what is concurrency exactly.
What's the difference between concurrency and parallelism?
Concurrency is much broader, general problem than parallelism. If you have tasks having inputs and outputs, and you want to schedule them so that they produce correct results, you are solving a concurrency problem.
Take a look at this diagram:

It shows a data flow with input and output dependencies. Here tasks 2, 3, 4 can run concurrently after 1. There is no specific other between them, so we have multiple alternatives for running it sequentially. Showing only two of them:


Alternatively, these tasks can run in parallel, e.g. on another processor core, another processor, or an entirely separate computer.
On these diagrams, thread means a computation carried out on dedicated processor core, not an OS thread, as they are not necessarily parallel. How else could you run a multithreaded web server with dedicated threads for hundreds of connections?

It's not rocket science, but what I wanted to show on these diagrams is that running concurrent tasks in parallel can reduce the overall computation time. The results will remain correct as long as the partial order shown on the above data flow graph is correct. However running if we only have one thread, the different orders are apparently equivalent, at least regarding the overall time.
If we only have one processor, why do we even bother with writing concurrent applications? The processing time will not get shorter, and we add the overhead of scheduling. As a matter of fact, any modern operating system will also slice up the concurrent tasks and interleave them, so each of the slices will run for a short time.
There are various reasons for this.
We, humans like to interact with the computer in real time, e.g. as I type this text, I want to see it appearing on the screen immediately, at the same time listening to my favorite tracklist, and getting notifications about my incoming emails. Just imagine that you cannot drag a window while the movie keeps on playing in it.
Not all operations are carried out on the computer's CPU. If you want to write to an HDD for example, a lot of time is spent seeking to the position, writing the sectors, etc., and the intermittent time can be spent to do something else. The same applies to virtually every I/O, even computations carried out on the GPU.
These require the operating system kernel to run tasks in an interleaved manner, referred to as time-sharing. This is a very important property of modern operating systems. Let's see the basics of it.
A process - quite unsurprisingly - is a running instance of a computer program. It is what you see in the task manager of your operating system or
top.
A process consists of allocated memory which holds the program code, its data, a heap for dynamic memory allocations, and a lot more. However ,it is not the unit for multi-tasking in desktop operating systems.
Thread is the default unit - the task - of CPU usage. Code executed in a single thread is what we usually refer to as sequential or synchronous execution.
Threads are supported by nearly all operating systems (hence the multithreaded qualifier) and can be created with system calls. They have their own call stacks, virtual CPU and (often) local storage but share the application's heap, data, codebase and resources (such as file handles) with the other threads in the same process.
They also serve as the unit of scheduling in the kernel. For this reason, we call them kernel threads, clarifying that they are native to the operating system and scheduled by the kernel, which distinguishes them from user-space threads, also called green threads, which are scheduled by some user space scheduler such as a library or VM.

Most desktop and server operating system kernels use preemptive schedulers, as does the Linux, macOS and Windows kernel. We can assume that threads are preemptively scheduled, distinguishing them from their non-preemptive (cooperative) counterparts, called fibers. This preemptive scheduling is the reason that a hanging process doesn't stall the whole computer.
The hanging time slices are interleaved with other processes' and the OS' code, so the system as a whole remains responsive.
“preemption is the act of temporarily interrupting a task being carried out by a computer system, without requiring its cooperation, and with the intention of resuming the task at a later time” - Wikipedia
Context switching (switching between threads) is done at frequent intervals by the kernel, creating the illusion that our programs are running in parallel, whereas in reality, they are running concurrently but sequentially in short slices. Multi-core processors arrived pretty late to commodity: funny that Intel's first dual-core processor was released in 2005, while multitasking OSes had already been in wide use for at least 20 years.
Programs usually don't only consist of numeric, arithmetic and logic computations, in fact, a lot of times they merely write something to the file system, do network requests or access peripheries such as the console or an external device.
While the first kind of workload is CPU intensive, the latter requires performing I/O in the majority of the time.
| CPU bound | I/O bound |
|---|---|
| scientific computation | reading from / writing to disk |
| (in-memory) data analysis | accessing camera, microphone, other devices |
| simulations | reading from / writing to network sockets |
| reading from stdin |
Doing I/O is a kernel space operation, initiated with a system call, so it results in a privilege context switch.
When an I/O operation is requested with a blocking system call, we are talking about blocking I/O.
This can deteriorate concurrency under implementations, concretely those that use many-to-one mapping. This means that all threads in a process share a common kernel thread, which implies that every thread is blocked when one does blocking I/O (because of the above-mentioned switch to kernel mode).
No wonder that modern OSes don't do this. Instead, they use one-to-one mapping, i.e. map a kernel thread to each user-space thread, allowing another thread to run when one makes a blocking system call, which means that they are unaffected by the above adverse effect.
Doing I/O usually consists of two distinct steps:
checking the device:
transmitting:
You can mix the two steps in every fashion. I skip delving into to technical details which I don't possess, instead, let me just draw an analogy.
Recently I moved to a new flat, so that's where the analogy comes from. Imagine that you have to pack your things and transfer them to your new apartment. This is how it is done with different types of I/O:

Synchronous, blocking I/O: Start to move right away, possibly got blocked by traffic on the road. For multiple turns, you are required to repeat the first two steps.

Synchronous, non-blocking I/O: Periodically check the road for traffic, only move stuff when clear. Between the checks you can do anything else you want, rather than wasting your time on the road being blocked by others. For multiple turns, you are required to repeat the first three steps.

Asynchronous, non-blocking I/O: Hire a moving company. They will ask you periodically if there's anything left to move, then you give them some of your belongings. Between their interruptions, you can do whatever you want. Finally, they notify you when they are done.
Which model suits you the best depends on your application, the complexity you dare to tackle, your OS's support, etc.
Synchronous, blocking I/O has wide support with long established POSIX interfaces and is the most widely understood and easy to use. Its drawback is that you have to rely on thread-based concurrency, which is sometimes undesirable:
That's why modern web servers shifted to the async non-blocking model, and advocate using a single-threaded event loop for the network interface to maximize the throughput. Because currently, the underlying OS APIs are platform-specific and quite challenging to use, there are a couple of libraries providing an abstraction layer over it. You can check the end of the article for the list later.
If you want to know more about the details of different I/O models, read this detailed article about boosting performance using asynchronous IO!
Busy-waiting is the act of repeatedly checking a resource, such as I/O for availability in a tight loop. The absence of the tight loop is what distinguishes polling from busy-waiting.
It's better shown than said:
// tight-loop example
while(pthread_mutex_trylock(&my_mutex) == EBUSY) { }
// mutex is unlocked
do_stuff();
// polling example
while(pthread_mutex_trylock(&my_mutex) == EBUSY) {
  sleep(POLL_INTERVAL);
}
// mutex is unlocked
do_stuff();
The difference between the two code is apparent. The sleep function puts the current thread of execution to sleep, yielding control to the kernel to schedule something else to run.
It is also obvious that both of them offer a technique of turning non-blocking code into blocking code, because control won't pass the loop until the mutex becomes free. This means that do_stuff is blocked.
Let's say we have more of these mutexes or any arbitrary I/O device that can be polled. We can invert control-flow by assigning handlers to be called when the resource is ready. If we periodically check the resources in the loop and execute the associated handlers on completion, we created what is called an event loop.
pending_event_t *pendings;
completed_event_t *completeds;
struct timespec start, end;
size_t completed_ev_size, pending_ev_size, i;
long loop_quantum_us;
long wait_us;

// do while we have pending events that are not yet completed
while (pending_events_size) {
  clock_gettime(CLOCK_MONOTONIC, &start);
  // check whether they are completed already
  for (i = 0; i < pending_events_size; ++i) {
    poll(&pendings, &pending_ev_size, &completeds, &completed_ev_size);
  }
  // handle completed events, the handlers might add more pending events
  for (i = 0; i < completeds_size; ++i) {
    handle(&completeds, &completed_ev_size, &pendings, &pending_ev_size);
  }
  // sleep for a while to avoid busy waiting
  clock_gettime(CLOCK_MONOTONIC, &end);
  wait_us = (end.tv_sec - start.tv_sec) * 1e6 + (end.tv_nsec - start.tv_nsec) / 1e3 - loop_quantum_us;
  if (wait_us > 0) {
    usleep(wait_us * 1e3);
  }
}
This kind of control inversion takes some time getting used to. Different frameworks expose various levels of abstractions over it. Some only provide an API for polling events, while others use a more opinionated mechanism like an event loop or a state machine.
The following example will illustrate the differences between working with synchronous, blocking and asynchronous, non-blocking network I/O. It is a dead-simple TCP echo server. After the client connects, every line is echoed back to the socket until the client writes "bye".
The first version uses the standard POSIX procedures of sys/socket.h. The server is single-threaded, it waits until a client connects
/*  Wait for a connection, then accept() it  */
if ((conn_s = accept(list_s, NULL, NULL)) < 0) { /* exit w err */ }
Then it reads from the socket each line and echoes it back until the client closes connection or prints the word "bye" on a line:
bye = 0;

// read from socket and echo back until client says 'bye'
while (!bye) {
    read_line_from_socket(conn_s, buffer, MAX_LINE - 1);
    if (!strncmp(buffer, "bye\n", MAX_LINE - 1)) bye = 1;
    write_line_to_socket(conn_s, buffer, strlen(buffer));
}

if (close(conn_s) < 0) { /* exit w err */ }

As you can see on the gif, this server is not concurrent at all. It can handle only one client at a time. If another client connects, it has to wait until the preceding one closes the connection.
Introducing concurrency without replacing the synchronous blocking networking API calls is done with threads. This is shown in the second version. The only difference between this and the single-threaded version is that here we create a thread for each of the connections.
A real-life server would use thread pools of course.
/*  Wait for a connection, then accept() it  */
if ((conn_s = accept(list_s, NULL, NULL)) < 0) { /* exit w err */ }
args = malloc(sizeof(int));
memcpy(args, &conn_s, sizeof(int));
pthread_create(&thrd, NULL, &handle_socket, args);

This finally enables us to serve multiple clients at the same time. Hurray!
Another way to create a concurrent server is to use libuv. It exposes asynchronous non-blocking I/O calls and an event loop. Although by using it, our code will be coupled to this library, I still find it better than using obscure, platform-dependent APIs. The implementation is still quite complex.
Once we initialized our tcp server, we register a listener handle_socket for incoming connections.
uv_listen((uv_stream_t*) &tcp, SOMAXCONN, handle_socket);
In that handler, we can accept the socket and register a reader for incoming chunks.
uv_accept(server, (uv_stream_t*) client);
uv_read_start((uv_stream_t*) client, handle_alloc, handle_read);
Whenever a chunk is ready and there is data, we register a write handler handle_write that echoes the data back to the socket.
uv_write(write_req, client, &write_ctx->buf, 1, handle_write);
Else if the client said bye, or we reached EOF, we close the connection. You can see that to program this way is very tedious and error-prone (I definitely made some bugs myself, although I copied a large portion of it). Data created in one function often has to be available somewhere in its continuation (a handler created in the function, but asynchronously called later), which requires manual memory management. I advise you against using libuv directly, unless you are well acquainted in C programming.

We've seen how to achieve concurrency in the lowest levels of programming. Take your time to play with the examples. Also, feel free to check out this list I prepared for you:
In the next chapter, we continue with some good ol' concurrency patterns and new ones as well. We will see how to use futures and promises for threads and continuations and will also talk about the reactor and proactor design patterns.
If you have any comments or questions about this topic, please let me know in the comment section below.
Building a Microblog Using Node.js, Git and Markdown was peer reviewed by Mark Brown, Jani Hartikainen and Joan Yin. Thanks to all of SitePoint’s peer reviewers for making SitePoint content the best it can be!

The word micro gets thrown around a lot in modern programming: micro-frameworks, micro-services, etc. To me, this means solving the problem at hand with no bloat. All while solving for a clean-cut single concern. This means focusing on the problem at hand and cutting unnecessary dependencies.
I feel Node follows the Goldilocks principle when it comes to the web. The set of APIs you get from low-level libraries is useful for building micro websites. These APIs are not too complex, nor too simple, but just right for building web solutions.
In this article, let’s explore building a microblog with Node, Git, and a few dependencies. The purpose of this app will be to serve static content from files committed to a repository. You will learn how to build and test an app, and gain insight into the process of delivering a solution. By the end, you will have a minimalist working blog app that you can build on.
To build an awesome blog, first, you need a few ingredients:
To send an HTTP message, I choose Node, as this gives me just what I need to send a hypertext message from a server. The two modules of particular interest are http and fs.
The http module will create a Node HTTP server. The fs module will read a file. Node has the library to build a micro-blog using HTTP.
To store a repository of blog posts, I’ll pick Git instead of a full-fledged database. The reason for this, Git is already a repository of text documents with version control. This is just what I need to store blog post data. Freedom from adding a database as a dependency frees me from coding for a ton of problems.
I choose to store blog posts in Markdown format and parse them using marked. This gives me freedom towards the progressive enhancement of raw content if I decide to do this later. Markdown is a nice, lightweight alternative to plain HTML.
For unit tests, I choose the excellent test runner called roast.it. I’ll pick this alternative because it has no dependencies and solves my unit test needs. You could pick another test runner like taper, but it has about eight dependencies. What I like about roast.it is that it has no dependencies.
With this list of ingredients, I have all the dependencies I need to build a micro-blog.
Picking dependencies is not a trivial matter. I think the key is anything that is outside the immediate problem can become a dependency. For example, I am not building a test runner nor a data repository, so that gets appended to the list. Any given dependency must not swallow the solution and hold the code hostage. So, it makes sense to pick out lightweight components only.
This article assumes some familiarity with Node, npm and Git, as well as with various testing methodologies. I won’t walk through every step involved in building the micro-blog, rather I’ll focus on and discuss specific areas of the code. If you’d like to follow along at home, the code is up on GitHub and you can try out each code snippet as it’s shown.
Testing gives you confidence in your code and tightens the feedback loop. A feedback loop in programming is the time it takes between writing any new code and running it. In any web solution, this means jumping through many layers to get any feedback. For example, a browser, a web server, and even a database. As complexity increases, this can mean minutes or even an hour to get feedback. With unit tests, we drop those layers and get fast feedback. This keeps the focus on the problem at hand.
I like to start any solution by writing a quick unit test. This gets me in the mindset of writing tests for any new code. This is how you’d get up and running with roast.it.
Inside the package.json file, add:
"scripts": {
  "test": "node test/test.js"
},
"devDependencies": {
  "roast.it": "1.0.4"
}
The test.js file is where you bring in all unit tests and run them. For example, one can do:
var roast = require('roast.it');

roast.it('Is array empty', function isArrayEmpty() {
  var mock = [];

  return mock.length === 0;
});

roast.run();
roast.exit();
To run the test do npm install && npm test. What makes me happy is I no longer need to jump through hoops to test new code. This is what testing is all about: a happy coder gaining confidence and staying focused on the solution.
As you can see, the test runner expects a call to roast.it(strNameOfTest, callbackWithTest). The return at the end of each test must resolve to true for the test to pass. In a real-world app, you wouldn’t want to write all tests in a single file. To get around this, you can require unit tests in Node and put them in a different file. If you have a look at test.js in the micro-blog, you’ll see this is exactly what I have done.
Tip: you run the tests using
npm run test. This can be abbreviated tonpm testor evennpm t.
The micro-blog will respond to client requests using Node. One effective way of doing this is through the http.CreateServer() Node API. This can be seen in the following excerpt from app.js:
/* app.js */
var http = require('http');
var port = process.env.port || 1337;

var app = http.createServer(function requestListener(req, res) {
  res.writeHead(200, { 'Content-Type': 'text/plain; charset=utf-8'});
  res.end('A simple micro blog website with no frills nor nonsense.');
});

app.listen(port);

console.log('Listening on http://localhost:' + port);
Run this via an npm script in package.json:
"scripts": {
  "start": "node app.js"
}
Now, http://localhost:1337/ becomes the default route and responds with a message back to the client. The idea is to add more routes that return other responses, like responding with blog post content.
To frame the structure of the app, I’ve decided on these main sections:
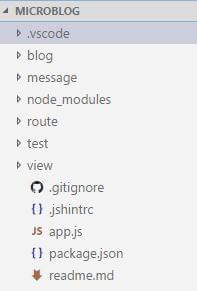
I’ll use these folders to organize the code. Here’s an overview of what each folder is for:
blog: stores raw blog posts in plain Markdownmessage: reusable modules to build response messages to the clientroute: routes beyond the default routetest: place to write unit testsview: place to put HTML templatesAs previously mentioned, feel free to follow along, the code is up on GitHub. You can try out each code snippet as it’s shown.
For the first use case, I’ll introduce a further route for blog posts. I choose to put this route in a testable component called BlogRoute. What I like is you can inject dependencies into this. Having this separation of concerns between the unit and its dependencies enables unit tests. Each dependency gets a mock in an isolated test. This allows you to write tests that are immutable, repeatable and fast.
The constructor, for example, looks like this:
/* route/blogRoute.js */
var BlogRoute = function BlogRoute(context) {
  this.req = context.req;
};
An effective unit test is:
/* test/blogRouteTest.js */
roast.it('Is valid blog route', function isValidBlogRoute() {
  var req = {
    method: 'GET',
    url: 'http://localhost/blog/a-simple-test'
  };

  var route = new BlogRoute({ req: req });

  return route.isValidRoute();
});
For now, BlogRoute expects a req object, this comes from the Node API. For the test to pass, it’s enough to do:
/* route/blogRoute.js */
BlogRoute.prototype.isValidRoute = function isValidRoute() {
  return this.req.method === 'GET' && this.req.url.indexOf('/blog/') >= 0;
};
With this we can wire it to the request pipeline. You can do something like this inside app.js:
/* app.js */
var message = require('./message/message');
var BlogRoute = require('./route/BlogRoute');
// Inside createServer requestListener callback...

  var blogRoute = new BlogRoute({ message: message, req: req, res: res });

  if (blogRoute.isValidRoute()) {
    blogRoute.route();
    return;
  }
// ...
The nice thing about having tests is I don’t have to worry about implementation details up front. I’ll define message soon. The res and req objects come from the http.createServer() Node API.
Feel free to go poke around the blog route, in route/blogRoute.js.
The next problem to solve is reading raw blog post data inside BlogRoute.route(). Node offers a fs module you can use to read from the filesystem.
For example:
/* message/readTextFile.js */
var fs = require('fs');
var path = require('path');

function readTextFile(relativePath, fn) {
  var fullPath = path.join(__dirname, '../') + relativePath;

  fs.readFile(fullPath, 'utf-8', function fileRead(err, text) {
    fn(err, text);
  });
}
This code snippet is in message/readTextFile.js. At the heart of the solution, you read text files that are in the repository. Note fs.readFile() is an asynchronous operation. This is the reason it takes a fn callback and calls that with file data. This asynchronous solution uses a humble callback.
This provides for the file IO needs. What I like about it is it only solves for a single concern. Since this is a cross-cutting concern, such as reading a file, there is no need for unit tests. A unit test should only test your own code in isolation, not somebody else’s.
You could, in theory, mock the file system in memory and write unit tests this way, but the solution will then start leaking concerns everywhere and turn into mush.
A cross-cutting concern, such as reading a file is beyond the scope of your code. Reading a file, for example, depends on subsystems that are beyond your direct control. This makes tests brittle and adds time and complexity to the feedback loop. It is a concern that must be separate from your solution.
Inside the BlogRoute.route() function I can now do:
/* route/bogRoute.js */
BlogRoute.prototype.route = function route() {
  var url = this.req.url;
  var index = url.indexOf('/blog/') + 1;
  var path = url.slice(index) + '.md';

  this.message.readTextFile(path, function dummyTest(err, rawContent) {
    this.res.writeHead(200, { 'Content-Type': 'text/html; charset=utf-8' });
    this.res.end(rawContent);
  }.bind(this));
};
Note that message and res get injected through the BlogRoute constructor, as such:
this.message = context.message;
this.res = context.res;
Take the req object from the request, and read a Markdown file. Don’t worry about dummyTest(). For now, treat it like any other callback that handles the response.
To unit test this BlogRoute.route() function:
/* test/blogRouteTest.js */
roast.it('Read raw post with path', function readRawPostWithPath() {
  var messageMock = new MessageMock();
  var req = {
    url: 'http://localhost/blog/a-simple-test'
  };

  var route = new BlogRoute({ message: messageMock, req: req });

  route.route();

  return messageMock.readTextFileCalledWithPath === 'blog/a-simple-test.md' &&
    messageMock.hasCallback;
});
The message module gets injected into the BlogRoute to mock message.readTextFile(). With this, I can verify that the system under test (i.e. BlogRoute.route()) passes.
You wouldn’t want to require modules right in the code that needs them here. The reason is, you are hot gluing dependencies. This makes any kind of testing turn into full integration tests – message.readTextFile(), for example, will read an actual file.
This approach is called dependency inversion, one of the SOLID principles. This decouples software modules and enables dependency injection. The unit test builds on this principle with a mock dependency. messageMock.readTextFileCalledWithPath, for example, tests that this unit alone behaves as it should. It does not cross functional boundaries.
Do not be afraid of the mock. It’s a lightweight object used to test things. You could use sinon, for example, and add this dependency for mocks.
What I like are custom mocks, as this provides flexibility in handling many use cases. One advantage custom mocks provide is they declutter mocks from test code. This adds precision and clarity to unit tests.
All MessageMock does for now is:
/* test/mock/messageMock.js */
var MessageMock = function MessageMock() {
  this.readTextFileCalledWithPath = '';
  this.hasCallback = false;
};

MessageMock.prototype.readTextFile = function readTextFile(path, callback) {
  this.readTextFileCalledWithPath = path;

  if (typeof callback === 'function') {
    this.hasCallback = true;
  }
};
You can find this code in test/mock/messageMock.js.
Note the mock does not need to have any asynchronous behavior. In fact, it never even calls the callback. The purpose is to make sure it’s used in a way that fulfills the use case. Make sure message.readTextFile() gets called and has the proper path and callback.
The actual message object that gets injected into the BlogRoute comes from message/message.js. What it does is bring all reusable components into a single utility object.
For example:
/* message/message.js */
var readTextFile = require('./readTextFile');

module.exports = {
  readTextFile: readTextFile
};
This is an effective pattern you can use in Node. Name the file after the folder and export all components inside the folder from a single place.
At this point, the app is all wired up and ready to send back raw Markdown data. Time for an end to end test to verify this works.
Type npm start then, in a separate command line window, do curl -v http://localhost:1337/blog/my-first-post:
Post data gets into the repository through Git. You can persist blog post changes through git commit.
For the next problem, time to turn the raw Markdown data from the repository into HTML. There are two steps to this process:
view folderIn sound programming, the idea is to take a large problem and break it into small bite-size pieces. Let’s solve the first problem: how do I get the HTML template based on what I have in BlogRoute?
One approach could be:
/* route/blogRoute.js */
BlogRoute.prototype.readPostHtmlView = function readPostHtmlView(err, rawContent) {
  if (err) {
    this.res.writeHead(404, { 'Content-Type': 'text/plain; charset=utf-8' });
    this.res.end('Post not found.');
    return;
  }

  this.rawContent = rawContent;
  this.message.readTextFile('view/blogPost.html', this.renderPost.bind(this));
};
Remember, this replaces the dummy callback used in the previous section, called dummyTest.
To replace the callback dummyTest, do:
this.message.readTextFile(path, this.readPostHtmlView.bind(this));
Time to write a quick unit test:
/* test/blogRouteTest.js */
roast.it('Read post view with path', function readPostViewWithPath() {
  var messageMock = new MessageMock();
  var rawContent = 'content';

  var route = new BlogRoute({ message: messageMock });

  route.readPostHtmlView(null, rawContent);

  return messageMock.readTextFileCalledWithPath !== '' &&
   route.rawContent === rawContent &&
   messageMock.hasCallback;
});
I’ve only tested for the happy path here. There is yet another test in case it can’t find the blog post. All BlogRoute unit tests are under test/blogRouteTest. Feel free to poke around in there, if interested.
At this point, you have passing tests! Even though it is impossible to verify the entire request pipeline, you have enough confidence to keep on going. Again, this what testing is all about: staying in the zone, focused, and being happy. There is no reason to be sad or frustrated while programming. I certainly think you should be happy rather than sad.
Note the instance stores raw Markdown post data in this.rawContent. There is more work afoot, and you can see that in the next callback (i.e. this.renderPost()).
In case you are not familiar with .bind(this), in JavaScript this an effective way to scope callback functions. By default, a callback gets scoped to the outer scope, which is no good in this case.
The next bite-size problem is to take the HTML template and raw content data and bring it all together. I’ll do this in BlogRoute.renderPost() which we used as a callback above.
Here’s one possible implementation:
/* route/blogRoute.js */
BlogRoute.prototype.renderPost = function renderPost(err, html) {
  if (err) {
    this.res.writeHead(500, { 'Content-Type': 'text/plain; charset=utf-8' });
    this.res.end('Internal error.');
    return;
  }

  var htmlContent = this.message.marked(this.rawContent);
  var responseContent = this.message.mustacheTemplate(html, { postContent: htmlContent });

  this.res.writeHead(200, { 'Content-Type': 'text/html; charset=utf-8' });
  this.res.end(responseContent);
};
Again, I’ll test the happy path:
/* test/blogRouteTest.js */
roast.it('Respond with full post', function respondWithFullPost() {
  var messageMock = new MessageMock();
  var responseMock = new ResponseMock();

  var route = new BlogRoute({ message: messageMock, res: responseMock });

  route.renderPost(null, '');

  return responseMock.result.indexOf('200') >= 0;
});
You may be wondering where responseMock comes from. Remember, mocks are lightweight objects used to test things. Use the ResponseMock to make sure res.writeHead() and res.end() get called.
In this mock, here’s what I put:
/* test/mock/responseMock.js */
var Response = function Response() {
  this.result = '';
};

Response.prototype.writeHead = function writeHead(returnCode) {
  this.result += returnCode + ';';
};

Response.prototype.end = function end(body) {
  this.result += body;
};
This response mock will do if it raises the level of confidence. As far as confidence goes, it is subjective to the author. Unit tests tell you what the person who wrote the code was thinking. This adds clarity to your programs.
The code is here: test/mock/responseMock.js.
Since I introduced message.marked() (to convert Markdown to HTML) and message.mustacheTemplate() (a lightweight templating function), I can mock those.
They get appended to MessageMock:
/* test/mock/messageMock.js */
MessageMock.prototype.marked = function marked() {
  return '';
};

MessageMock.prototype.mustacheTemplate = function mustacheTemplate() {
  return '';
};
At this point, it doesn’t matter what content each component returns. My main concern is to make sure both are part of the mock.
What is nice about having awesome mocks, is you can iterate and make them better. As you find bugs, you can beef up unit tests and add more use cases to the feedback loop.
With this, you get passing tests. Time to wire this up to the request pipeline.
In message/message.js do:
/* message/message.js */
var mustacheTemplate = require('./mustacheTemplate');
var marked = require('marked');
// ...

module.exports = {
  mustacheTemplate: mustacheTemplate,
// ...
  marked: marked
};
marked is the Markdown parser I chose to add as a dependency.
Add it to package.json:
"dependencies": {
  "marked": "0.3.6"
}
mustacheTemplate is a reusable component inside the message folder, located in message/mustacheTemplate.js. I decided to not add this as another dependency as, given the list of features I need, it seemed like overkill.
At the crux of the mustache template function is this:
/* message/mustacheTemplate.js */
function mustache(text, data) {
  var result = text;

  for (var prop in data) {
    if (data.hasOwnProperty(prop)) {
      var regExp = new RegExp('{{' + prop + '}}', 'g');

      result = result.replace(regExp, data[prop]);
    }
  }

  return result;
}
There are unit tests to verify this works. Feel free to poke around those too: test/mustacheTemplateTest.js.
You still need to add an HTML template or view. Within view/blogPost.html do something like:
<!-- view/blogPost.html -->
<body>
  <div>
    {{postContent}}
  </div>
</body>
With this in place, it’s time to demo inside a browser.
To try it, type npm start then go to http://localhost:1337/blog/my-first-post:

Never lose sight of modular, testable and reusable components in software. In fact, don’t let anyone talk you into a solution that is hostile to this. Any codebase can have clean code, even when tightly coupled to a framework, so don’t lose hope!
That just about gives you a working app. There are many possibilities from this point to get it production ready.
Some examples of possible improvements include:
There are no limits, and in your world you can take this app as far as you want.
I hope you see how you can build solutions in Node.js with just a few lightweight dependencies. All you need is a little imagination and a focus on the problem at hand. The set of APIs at your disposal are enough to build some amazing things.
It is nice to see just how important the KISS principle is to any solution. Solving for the immediate problem only, and keeping complexity as low as possible.
This working solution adds up to around 172KB on disk with dependencies. A solution this size will have incredible performance on just about any web host. A responsive and lightweight app will make users happy. The best part is, you now have a nice microblog to play with and take even further.
I’d love to read your comments and questions on the approach and hear what you think!
With this article, we are launching a series of posts targeting developers who want to learn or refresh their knowledge about writing concurrent applications in general. The series will focus on well-known and widely adopted concurrency patterns in different programming languages, platforms, and runtimes.
In the first episode of this series, we’ll start from the ground up: The OS level schedules our application’s I/O, so it’s essential to understand the principles.
Concurrent code has a bad reputation of being notoriously easy to screw up. One of the world's most infamous software disasters was caused by a race condition. A programmer error in the Therac-25 radiation therapy device resulted in the death of four people.
Data races are not the only problem, though: inefficient locking, starvation, and a myriad of other problems rise. I remember from university that even the seemingly trivial, innocent-looking task of writing a thread-safe singleton proved to be quite challenging because of these nuances.
No wonder that throughout the past decades' many concurrency-related patterns emerged to abstract away the complexity and snip the possibilities of errors. Some have arisen as a straightforward consequence of the properties of an application area, like event loops and dispatchers in window managers, GUI toolkits, and browsers; where others succeeded in creating more general approaches applicable to a broad range of use cases, like Erlang's actor system.
My experience is that after a brief learning period, most developers can write highly concurrent, good quality code in Node.js, which is also free from race conditions. Although nothing is stopping us from creating data races, this is far less frequently happening than in programming languages or platforms that expose threads, locks and shared memory as their main concurrency abstraction. I think it's mainly due to the more functional style of creating a data flow (e.g. promises) instead of imperatively synchronizing (e.g. with locks) concurrent computations.
However to reason about the "whats and whys," it is best to start from the ground up, which I think is the OS level. It's the OS that does the hard work of scheduling our applications and interleaving it with I/O, so it is essential that we understand the principles. Then we discuss concurrency primitives and patterns and finally arrive at frameworks.
Let the journey begin!
Before diving into the OS level details, let's take a second clarifying what is concurrency exactly.
What's the difference between concurrency and parallelism?
Concurrency is much broader, general problem than parallelism. If you have tasks having inputs and outputs, and you want to schedule them so that they produce correct results, you are solving a concurrency problem.
Take a look at this diagram:
It shows a data flow with input and output dependencies. Here tasks 2, 3, 4 can run concurrently after 1. There is no specific other between them, so we have multiple alternatives for running it sequentially. Showing only two of them:
Alternatively, these tasks can run in parallel, e.g. on another processor core, another processor, or an entirely separate computer.
On these diagrams, thread means a computation carried out on dedicated processor core, not an OS thread, as they are not necessarily parallel. How else could you run a multithreaded web server with dedicated threads for hundreds of connections?
It's not rocket science, but what I wanted to show on these diagrams is that running concurrent tasks in parallel can reduce the overall computation time. The results will remain correct as long as the partial order shown on the above data flow graph is correct. However running if we only have one thread, the different orders are apparently equivalent, at least regarding the overall time.
If we only have one processor, why do we even bother with writing concurrent applications? The processing time will not get shorter, and we add the overhead of scheduling. As a matter of fact, any modern operating system will also slice up the concurrent tasks and interleave them, so each of the slices will run for a short time.
There are various reasons for this.
We, humans like to interact with the computer in real time, e.g. as I type this text, I want to see it appearing on the screen immediately, at the same time listening to my favorite tracklist, and getting notifications about my incoming emails. Just imagine that you cannot drag a window while the movie keeps on playing in it.
Not all operations are carried out on the computer's CPU. If you want to write to an HDD for example, a lot of time is spent seeking to the position, writing the sectors, etc., and the intermittent time can be spent to do something else. The same applies to virtually every I/O, even computations carried out on the GPU.
These require the operating system kernel to run tasks in an interleaved manner, referred to as time-sharing. This is a very important property of modern operating systems. Let's see the basics of it.
A process - quite unsurprisingly - is a running instance of a computer program. It is what you see in the task manager of your operating system or
top.
A process consists of allocated memory which holds the program code, its data, a heap for dynamic memory allocations, and a lot more. However ,it is not the unit for multi-tasking in desktop operating systems.
Thread is the default unit - the task - of CPU usage. Code executed in a single thread is what we usually refer to as sequential or synchronous execution.
Threads are supported by nearly all operating systems (hence the multithreaded qualifier) and can be created with system calls. They have their own call stacks, virtual CPU and (often) local storage but share the application's heap, data, codebase and resources (such as file handles) with the other threads in the same process.
They also serve as the unit of scheduling in the kernel. For this reason, we call them kernel threads, clarifying that they are native to the operating system and scheduled by the kernel, which distinguishes them from user-space threads, also called green threads, which are scheduled by some user space scheduler such as a library or VM.
Most desktop and server operating system kernels use preemptive schedulers, as does the Linux, macOS and Windows kernel. We can assume that threads are preemptively scheduled, distinguishing them from their non-preemptive (cooperative) counterparts, called fibers. This preemptive scheduling is the reason that a hanging process doesn't stall the whole computer.
The hanging time slices are interleaved with other processes' and the OS' code, so the system as a whole remains responsive.
“preemption is the act of temporarily interrupting a task being carried out by a computer system, without requiring its cooperation, and with the intention of resuming the task at a later time” - Wikipedia
Context switching (switching between threads) is done at frequent intervals by the kernel, creating the illusion that our programs are running in parallel, whereas in reality, they are running concurrently but sequentially in short slices. Multi-core processors arrived pretty late to commodity: funny that Intel's first dual-core processor was released in 2005, while multitasking OSes had already been in wide use for at least 20 years.
Programs usually don't only consist of numeric, arithmetic and logic computations, in fact, a lot of times they merely write something to the file system, do network requests or access peripheries such as the console or an external device.
While the first kind of workload is CPU intensive, the latter requires performing I/O in the majority of the time.
| CPU bound | I/O bound |
|---|---|
| scientific computation | reading from / writing to disk |
| (in-memory) data analysis | accessing camera, microphone, other devices |
| simulations | reading from / writing to network sockets |
| reading from stdin |
Doing I/O is a kernel space operation, initiated with a system call, so it results in a privilege context switch.
When an I/O operation is requested with a blocking system call, we are talking about blocking I/O.
This can deteriorate concurrency under implementations, concretely those that use many-to-one mapping. This means that all threads in a process share a common kernel thread, which implies that every thread is blocked when one does blocking I/O (because of the above-mentioned switch to kernel mode).
No wonder that modern OSes don't do this. Instead, they use one-to-one mapping, i.e. map a kernel thread to each user-space thread, allowing another thread to run when one makes a blocking system call, which means that they are unaffected by the above adverse effect.
Doing I/O usually consists of two distinct steps:
checking the device:
transmitting:
You can mix the two steps in every fashion. I skip delving into to technical details which I don't possess, instead, let me just draw an analogy.
Recently I moved to a new flat, so that's where the analogy comes from. Imagine that you have to pack your things and transfer them to your new apartment. This is how it is done with different types of I/O:
Synchronous, blocking I/O: Start to move right away, possibly got blocked by traffic on the road. For multiple turns, you are required to repeat the first two steps.
Synchronous, non-blocking I/O: Periodically check the road for traffic, only move stuff when clear. Between the checks you can do anything else you want, rather than wasting your time on the road being blocked by others. For multiple turns, you are required to repeat the first three steps.
Asynchronous, non-blocking I/O: Hire a moving company. They will ask you periodically if there's anything left to move, then you give them some of your belongings. Between their interruptions, you can do whatever you want. Finally, they notify you when they are done.
Which model suits you the best depends on your application, the complexity you dare to tackle, your OS's support, etc.
Synchronous, blocking I/O has wide support with long established POSIX interfaces and is the most widely understood and easy to use. Its drawback is that you have to rely on thread-based concurrency, which is sometimes undesirable:
That's why modern web servers shifted to the async non-blocking model, and advocate using a single-threaded event loop for the network interface to maximize the throughput. Because currently, the underlying OS APIs are platform-specific and quite challenging to use, there are a couple of libraries providing an abstraction layer over it. You can check the end of the article for the list later.
If you want to know more about the details of different I/O models, read this detailed article about boosting performance using asynchronous IO!
Busy-waiting is the act of repeatedly checking a resource, such as I/O for availability in a tight loop. The absence of the tight loop is what distinguishes polling from busy-waiting.
It's better shown than said:
// tight-loop example
while(pthread_mutex_trylock(&my_mutex) == EBUSY) { }
// mutex is unlocked
do_stuff();
// polling example
while(pthread_mutex_trylock(&my_mutex) == EBUSY) {
  sleep(POLL_INTERVAL);
}
// mutex is unlocked
do_stuff();
The difference between the two code is apparent. The sleep function puts the current thread of execution to sleep, yielding control to the kernel to schedule something else to run.
It is also obvious that both of them offer a technique of turning non-blocking code into blocking code, because control won't pass the loop until the mutex becomes free. This means that do_stuff is blocked.
Let's say we have more of these mutexes or any arbitrary I/O device that can be polled. We can invert control-flow by assigning handlers to be called when the resource is ready. If we periodically check the resources in the loop and execute the associated handlers on completion, we created what is called an event loop.
pending_event_t *pendings;
completed_event_t *completeds;
struct timespec start, end;
size_t completed_ev_size, pending_ev_size, i;
long loop_quantum_us;
long wait_us;

// do while we have pending events that are not yet completed
while (pending_events_size) {
  clock_gettime(CLOCK_MONOTONIC, &start);
  // check whether they are completed already
  for (i = 0; i < pending_events_size; ++i) {
    poll(&pendings, &pending_ev_size, &completeds, &completed_ev_size);
  }
  // handle completed events, the handlers might add more pending events
  for (i = 0; i < completeds_size; ++i) {
    handle(&completeds, &completed_ev_size, &pendings, &pending_ev_size);
  }
  // sleep for a while to avoid busy waiting
  clock_gettime(CLOCK_MONOTONIC, &end);
  wait_us = (end.tv_sec - start.tv_sec) * 1e6 + (end.tv_nsec - start.tv_nsec) / 1e3 - loop_quantum_us;
  if (wait_us > 0) {
    usleep(wait_us * 1e3);
  }
}
This kind of control inversion takes some time getting used to. Different frameworks expose various levels of abstractions over it. Some only provide an API for polling events, while others use a more opinionated mechanism like an event loop or a state machine.
The following example will illustrate the differences between working with synchronous, blocking and asynchronous, non-blocking network I/O. It is a dead-simple TCP echo server. After the client connects, every line is echoed back to the socket until the client writes "bye".
The first version uses the standard POSIX procedures of sys/socket.h. The server is single-threaded, it waits until a client connects
/*  Wait for a connection, then accept() it  */
if ((conn_s = accept(list_s, NULL, NULL)) < 0) { /* exit w err */ }
Then it reads from the socket each line and echoes it back until the client closes connection or prints the word "bye" on a line:
bye = 0;

// read from socket and echo back until client says 'bye'
while (!bye) {
    read_line_from_socket(conn_s, buffer, MAX_LINE - 1);
    if (!strncmp(buffer, "bye\n", MAX_LINE - 1)) bye = 1;
    write_line_to_socket(conn_s, buffer, strlen(buffer));
}

if (close(conn_s) < 0) { /* exit w err */ }
As you can see on the gif, this server is not concurrent at all. It can handle only one client at a time. If another client connects, it has to wait until the preceding one closes the connection.
Introducing concurrency without replacing the synchronous blocking networking API calls is done with threads. This is shown in the second version. The only difference between this and the single-threaded version is that here we create a thread for each of the connections.
A real-life server would use thread pools of course.
/*  Wait for a connection, then accept() it  */
if ((conn_s = accept(list_s, NULL, NULL)) < 0) { /* exit w err */ }
args = malloc(sizeof(int));
memcpy(args, &conn_s, sizeof(int));
pthread_create(&thrd, NULL, &handle_socket, args);
This finally enables us to serve multiple clients at the same time. Hurray!
Another way to create a concurrent server is to use libuv. It exposes asynchronous non-blocking I/O calls and an event loop. Although by using it, our code will be coupled to this library, I still find it better than using obscure, platform-dependent APIs. The implementation is still quite complex.
Once we initialized our tcp server, we register a listener handle_socket for incoming connections.
uv_listen((uv_stream_t*) &tcp, SOMAXCONN, handle_socket);
In that handler, we can accept the socket and register a reader for incoming chunks.
uv_accept(server, (uv_stream_t*) client);
uv_read_start((uv_stream_t*) client, handle_alloc, handle_read);
Whenever a chunk is ready and there is data, we register a write handler handle_write that echoes the data back to the socket.
uv_write(write_req, client, &write_ctx->buf, 1, handle_write);
Else if the client said bye, or we reached EOF, we close the connection. You can see that to program this way is very tedious and error-prone (I definitely made some bugs myself, although I copied a large portion of it). Data created in one function often has to be available somewhere in its continuation (a handler created in the function, but asynchronously called later), which requires manual memory management. I advise you against using libuv directly, unless you are well acquainted in C programming.
We've seen how to achieve concurrency in the lowest levels of programming. Take your time to play with the examples. Also, feel free to check out this list I prepared for you:
In the next chapter, we continue with some good ol' concurrency patterns and new ones as well. We will see how to use futures and promises for threads and continuations and will also talk about the reactor and proactor design patterns.
If you have any comments or questions about this topic, please let me know in the comment section below.
Building a Microblog Using Node.js, Git and Markdown was peer reviewed by Mark Brown, Jani Hartikainen and Joan Yin. Thanks to all of SitePoint’s peer reviewers for making SitePoint content the best it can be!
The word micro gets thrown around a lot in modern programming: micro-frameworks, micro-services, etc. To me, this means solving the problem at hand with no bloat. All while solving for a clean-cut single concern. This means focusing on the problem at hand and cutting unnecessary dependencies.
I feel Node follows the Goldilocks principle when it comes to the web. The set of APIs you get from low-level libraries is useful for building micro websites. These APIs are not too complex, nor too simple, but just right for building web solutions.
In this article, let’s explore building a microblog with Node, Git, and a few dependencies. The purpose of this app will be to serve static content from files committed to a repository. You will learn how to build and test an app, and gain insight into the process of delivering a solution. By the end, you will have a minimalist working blog app that you can build on.
To build an awesome blog, first, you need a few ingredients:
To send an HTTP message, I choose Node, as this gives me just what I need to send a hypertext message from a server. The two modules of particular interest are http and fs.
The http module will create a Node HTTP server. The fs module will read a file. Node has the library to build a micro-blog using HTTP.
To store a repository of blog posts, I’ll pick Git instead of a full-fledged database. The reason for this, Git is already a repository of text documents with version control. This is just what I need to store blog post data. Freedom from adding a database as a dependency frees me from coding for a ton of problems.
I choose to store blog posts in Markdown format and parse them using marked. This gives me freedom towards the progressive enhancement of raw content if I decide to do this later. Markdown is a nice, lightweight alternative to plain HTML.
For unit tests, I choose the excellent test runner called roast.it. I’ll pick this alternative because it has no dependencies and solves my unit test needs. You could pick another test runner like taper, but it has about eight dependencies. What I like about roast.it is that it has no dependencies.
With this list of ingredients, I have all the dependencies I need to build a micro-blog.
Picking dependencies is not a trivial matter. I think the key is anything that is outside the immediate problem can become a dependency. For example, I am not building a test runner nor a data repository, so that gets appended to the list. Any given dependency must not swallow the solution and hold the code hostage. So, it makes sense to pick out lightweight components only.
This article assumes some familiarity with Node, npm and Git, as well as with various testing methodologies. I won’t walk through every step involved in building the micro-blog, rather I’ll focus on and discuss specific areas of the code. If you’d like to follow along at home, the code is up on GitHub and you can try out each code snippet as it’s shown.
Testing gives you confidence in your code and tightens the feedback loop. A feedback loop in programming is the time it takes between writing any new code and running it. In any web solution, this means jumping through many layers to get any feedback. For example, a browser, a web server, and even a database. As complexity increases, this can mean minutes or even an hour to get feedback. With unit tests, we drop those layers and get fast feedback. This keeps the focus on the problem at hand.
I like to start any solution by writing a quick unit test. This gets me in the mindset of writing tests for any new code. This is how you’d get up and running with roast.it.
Inside the package.json file, add:
"scripts": {
  "test": "node test/test.js"
},
"devDependencies": {
  "roast.it": "1.0.4"
}
The test.js file is where you bring in all unit tests and run them. For example, one can do:
var roast = require('roast.it');

roast.it('Is array empty', function isArrayEmpty() {
  var mock = [];

  return mock.length === 0;
});

roast.run();
roast.exit();
To run the test do npm install && npm test. What makes me happy is I no longer need to jump through hoops to test new code. This is what testing is all about: a happy coder gaining confidence and staying focused on the solution.
As you can see, the test runner expects a call to roast.it(strNameOfTest, callbackWithTest). The return at the end of each test must resolve to true for the test to pass. In a real-world app, you wouldn’t want to write all tests in a single file. To get around this, you can require unit tests in Node and put them in a different file. If you have a look at test.js in the micro-blog, you’ll see this is exactly what I have done.
Tip: you run the tests using
npm run test. This can be abbreviated tonpm testor evennpm t.
The micro-blog will respond to client requests using Node. One effective way of doing this is through the http.CreateServer() Node API. This can be seen in the following excerpt from app.js:
/* app.js */
var http = require('http');
var port = process.env.port || 1337;

var app = http.createServer(function requestListener(req, res) {
  res.writeHead(200, { 'Content-Type': 'text/plain; charset=utf-8'});
  res.end('A simple micro blog website with no frills nor nonsense.');
});

app.listen(port);

console.log('Listening on http://localhost:' + port);
Run this via an npm script in package.json:
"scripts": {
  "start": "node app.js"
}
Now, http://localhost:1337/ becomes the default route and responds with a message back to the client. The idea is to add more routes that return other responses, like responding with blog post content.
To frame the structure of the app, I’ve decided on these main sections:
I’ll use these folders to organize the code. Here’s an overview of what each folder is for:
blog: stores raw blog posts in plain Markdownmessage: reusable modules to build response messages to the clientroute: routes beyond the default routetest: place to write unit testsview: place to put HTML templatesAs previously mentioned, feel free to follow along, the code is up on GitHub. You can try out each code snippet as it’s shown.
For the first use case, I’ll introduce a further route for blog posts. I choose to put this route in a testable component called BlogRoute. What I like is you can inject dependencies into this. Having this separation of concerns between the unit and its dependencies enables unit tests. Each dependency gets a mock in an isolated test. This allows you to write tests that are immutable, repeatable and fast.
The constructor, for example, looks like this:
/* route/blogRoute.js */
var BlogRoute = function BlogRoute(context) {
  this.req = context.req;
};
An effective unit test is:
/* test/blogRouteTest.js */
roast.it('Is valid blog route', function isValidBlogRoute() {
  var req = {
    method: 'GET',
    url: 'http://localhost/blog/a-simple-test'
  };

  var route = new BlogRoute({ req: req });

  return route.isValidRoute();
});
For now, BlogRoute expects a req object, this comes from the Node API. For the test to pass, it’s enough to do:
/* route/blogRoute.js */
BlogRoute.prototype.isValidRoute = function isValidRoute() {
  return this.req.method === 'GET' && this.req.url.indexOf('/blog/') >= 0;
};
With this we can wire it to the request pipeline. You can do something like this inside app.js:
/* app.js */
var message = require('./message/message');
var BlogRoute = require('./route/BlogRoute');
// Inside createServer requestListener callback...

  var blogRoute = new BlogRoute({ message: message, req: req, res: res });

  if (blogRoute.isValidRoute()) {
    blogRoute.route();
    return;
  }
// ...
The nice thing about having tests is I don’t have to worry about implementation details up front. I’ll define message soon. The res and req objects come from the http.createServer() Node API.
Feel free to go poke around the blog route, in route/blogRoute.js.
The next problem to solve is reading raw blog post data inside BlogRoute.route(). Node offers a fs module you can use to read from the filesystem.
For example:
/* message/readTextFile.js */
var fs = require('fs');
var path = require('path');

function readTextFile(relativePath, fn) {
  var fullPath = path.join(__dirname, '../') + relativePath;

  fs.readFile(fullPath, 'utf-8', function fileRead(err, text) {
    fn(err, text);
  });
}
This code snippet is in message/readTextFile.js. At the heart of the solution, you read text files that are in the repository. Note fs.readFile() is an asynchronous operation. This is the reason it takes a fn callback and calls that with file data. This asynchronous solution uses a humble callback.
This provides for the file IO needs. What I like about it is it only solves for a single concern. Since this is a cross-cutting concern, such as reading a file, there is no need for unit tests. A unit test should only test your own code in isolation, not somebody else’s.
You could, in theory, mock the file system in memory and write unit tests this way, but the solution will then start leaking concerns everywhere and turn into mush.
A cross-cutting concern, such as reading a file is beyond the scope of your code. Reading a file, for example, depends on subsystems that are beyond your direct control. This makes tests brittle and adds time and complexity to the feedback loop. It is a concern that must be separate from your solution.
Inside the BlogRoute.route() function I can now do:
/* route/bogRoute.js */
BlogRoute.prototype.route = function route() {
  var url = this.req.url;
  var index = url.indexOf('/blog/') + 1;
  var path = url.slice(index) + '.md';

  this.message.readTextFile(path, function dummyTest(err, rawContent) {
    this.res.writeHead(200, { 'Content-Type': 'text/html; charset=utf-8' });
    this.res.end(rawContent);
  }.bind(this));
};
Note that message and res get injected through the BlogRoute constructor, as such:
this.message = context.message;
this.res = context.res;
Take the req object from the request, and read a Markdown file. Don’t worry about dummyTest(). For now, treat it like any other callback that handles the response.
To unit test this BlogRoute.route() function:
/* test/blogRouteTest.js */
roast.it('Read raw post with path', function readRawPostWithPath() {
  var messageMock = new MessageMock();
  var req = {
    url: 'http://localhost/blog/a-simple-test'
  };

  var route = new BlogRoute({ message: messageMock, req: req });

  route.route();

  return messageMock.readTextFileCalledWithPath === 'blog/a-simple-test.md' &&
    messageMock.hasCallback;
});
The message module gets injected into the BlogRoute to mock message.readTextFile(). With this, I can verify that the system under test (i.e. BlogRoute.route()) passes.
You wouldn’t want to require modules right in the code that needs them here. The reason is, you are hot gluing dependencies. This makes any kind of testing turn into full integration tests – message.readTextFile(), for example, will read an actual file.
This approach is called dependency inversion, one of the SOLID principles. This decouples software modules and enables dependency injection. The unit test builds on this principle with a mock dependency. messageMock.readTextFileCalledWithPath, for example, tests that this unit alone behaves as it should. It does not cross functional boundaries.
Do not be afraid of the mock. It’s a lightweight object used to test things. You could use sinon, for example, and add this dependency for mocks.
What I like are custom mocks, as this provides flexibility in handling many use cases. One advantage custom mocks provide is they declutter mocks from test code. This adds precision and clarity to unit tests.
All MessageMock does for now is:
/* test/mock/messageMock.js */
var MessageMock = function MessageMock() {
  this.readTextFileCalledWithPath = '';
  this.hasCallback = false;
};

MessageMock.prototype.readTextFile = function readTextFile(path, callback) {
  this.readTextFileCalledWithPath = path;

  if (typeof callback === 'function') {
    this.hasCallback = true;
  }
};
You can find this code in test/mock/messageMock.js.
Note the mock does not need to have any asynchronous behavior. In fact, it never even calls the callback. The purpose is to make sure it’s used in a way that fulfills the use case. Make sure message.readTextFile() gets called and has the proper path and callback.
The actual message object that gets injected into the BlogRoute comes from message/message.js. What it does is bring all reusable components into a single utility object.
For example:
/* message/message.js */
var readTextFile = require('./readTextFile');

module.exports = {
  readTextFile: readTextFile
};
This is an effective pattern you can use in Node. Name the file after the folder and export all components inside the folder from a single place.
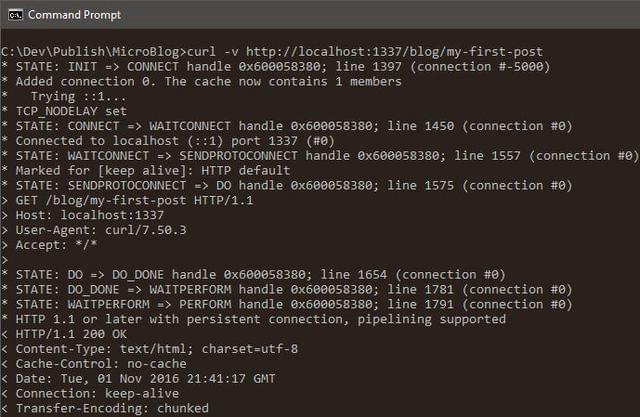
At this point, the app is all wired up and ready to send back raw Markdown data. Time for an end to end test to verify this works.
Type npm start then, in a separate command line window, do curl -v http://localhost:1337/blog/my-first-post:
Post data gets into the repository through Git. You can persist blog post changes through git commit.
For the next problem, time to turn the raw Markdown data from the repository into HTML. There are two steps to this process:
view folderIn sound programming, the idea is to take a large problem and break it into small bite-size pieces. Let’s solve the first problem: how do I get the HTML template based on what I have in BlogRoute?
One approach could be:
/* route/blogRoute.js */
BlogRoute.prototype.readPostHtmlView = function readPostHtmlView(err, rawContent) {
  if (err) {
    this.res.writeHead(404, { 'Content-Type': 'text/plain; charset=utf-8' });
    this.res.end('Post not found.');
    return;
  }

  this.rawContent = rawContent;
  this.message.readTextFile('view/blogPost.html', this.renderPost.bind(this));
};
Remember, this replaces the dummy callback used in the previous section, called dummyTest.
To replace the callback dummyTest, do:
this.message.readTextFile(path, this.readPostHtmlView.bind(this));
Time to write a quick unit test:
/* test/blogRouteTest.js */
roast.it('Read post view with path', function readPostViewWithPath() {
  var messageMock = new MessageMock();
  var rawContent = 'content';

  var route = new BlogRoute({ message: messageMock });

  route.readPostHtmlView(null, rawContent);

  return messageMock.readTextFileCalledWithPath !== '' &&
   route.rawContent === rawContent &&
   messageMock.hasCallback;
});
I’ve only tested for the happy path here. There is yet another test in case it can’t find the blog post. All BlogRoute unit tests are under test/blogRouteTest. Feel free to poke around in there, if interested.
At this point, you have passing tests! Even though it is impossible to verify the entire request pipeline, you have enough confidence to keep on going. Again, this what testing is all about: staying in the zone, focused, and being happy. There is no reason to be sad or frustrated while programming. I certainly think you should be happy rather than sad.
Note the instance stores raw Markdown post data in this.rawContent. There is more work afoot, and you can see that in the next callback (i.e. this.renderPost()).
In case you are not familiar with .bind(this), in JavaScript this an effective way to scope callback functions. By default, a callback gets scoped to the outer scope, which is no good in this case.
The next bite-size problem is to take the HTML template and raw content data and bring it all together. I’ll do this in BlogRoute.renderPost() which we used as a callback above.
Here’s one possible implementation:
/* route/blogRoute.js */
BlogRoute.prototype.renderPost = function renderPost(err, html) {
  if (err) {
    this.res.writeHead(500, { 'Content-Type': 'text/plain; charset=utf-8' });
    this.res.end('Internal error.');
    return;
  }

  var htmlContent = this.message.marked(this.rawContent);
  var responseContent = this.message.mustacheTemplate(html, { postContent: htmlContent });

  this.res.writeHead(200, { 'Content-Type': 'text/html; charset=utf-8' });
  this.res.end(responseContent);
};
Again, I’ll test the happy path:
/* test/blogRouteTest.js */
roast.it('Respond with full post', function respondWithFullPost() {
  var messageMock = new MessageMock();
  var responseMock = new ResponseMock();

  var route = new BlogRoute({ message: messageMock, res: responseMock });

  route.renderPost(null, '');

  return responseMock.result.indexOf('200') >= 0;
});
You may be wondering where responseMock comes from. Remember, mocks are lightweight objects used to test things. Use the ResponseMock to make sure res.writeHead() and res.end() get called.
In this mock, here’s what I put:
/* test/mock/responseMock.js */
var Response = function Response() {
  this.result = '';
};

Response.prototype.writeHead = function writeHead(returnCode) {
  this.result += returnCode + ';';
};

Response.prototype.end = function end(body) {
  this.result += body;
};
This response mock will do if it raises the level of confidence. As far as confidence goes, it is subjective to the author. Unit tests tell you what the person who wrote the code was thinking. This adds clarity to your programs.
The code is here: test/mock/responseMock.js.
Since I introduced message.marked() (to convert Markdown to HTML) and message.mustacheTemplate() (a lightweight templating function), I can mock those.
They get appended to MessageMock:
/* test/mock/messageMock.js */
MessageMock.prototype.marked = function marked() {
  return '';
};

MessageMock.prototype.mustacheTemplate = function mustacheTemplate() {
  return '';
};
At this point, it doesn’t matter what content each component returns. My main concern is to make sure both are part of the mock.
What is nice about having awesome mocks, is you can iterate and make them better. As you find bugs, you can beef up unit tests and add more use cases to the feedback loop.
With this, you get passing tests. Time to wire this up to the request pipeline.
In message/message.js do:
/* message/message.js */
var mustacheTemplate = require('./mustacheTemplate');
var marked = require('marked');
// ...

module.exports = {
  mustacheTemplate: mustacheTemplate,
// ...
  marked: marked
};
marked is the Markdown parser I chose to add as a dependency.
Add it to package.json:
"dependencies": {
  "marked": "0.3.6"
}
mustacheTemplate is a reusable component inside the message folder, located in message/mustacheTemplate.js. I decided to not add this as another dependency as, given the list of features I need, it seemed like overkill.
At the crux of the mustache template function is this:
/* message/mustacheTemplate.js */
function mustache(text, data) {
  var result = text;

  for (var prop in data) {
    if (data.hasOwnProperty(prop)) {
      var regExp = new RegExp('{{' + prop + '}}', 'g');

      result = result.replace(regExp, data[prop]);
    }
  }

  return result;
}
There are unit tests to verify this works. Feel free to poke around those too: test/mustacheTemplateTest.js.
You still need to add an HTML template or view. Within view/blogPost.html do something like:
<!-- view/blogPost.html -->
<body>
  <div>
    {{postContent}}
  </div>
</body>
With this in place, it’s time to demo inside a browser.
To try it, type npm start then go to http://localhost:1337/blog/my-first-post:
Never lose sight of modular, testable and reusable components in software. In fact, don’t let anyone talk you into a solution that is hostile to this. Any codebase can have clean code, even when tightly coupled to a framework, so don’t lose hope!
That just about gives you a working app. There are many possibilities from this point to get it production ready.
Some examples of possible improvements include:
There are no limits, and in your world you can take this app as far as you want.
I hope you see how you can build solutions in Node.js with just a few lightweight dependencies. All you need is a little imagination and a focus on the problem at hand. The set of APIs at your disposal are enough to build some amazing things.
It is nice to see just how important the KISS principle is to any solution. Solving for the immediate problem only, and keeping complexity as low as possible.
This working solution adds up to around 172KB on disk with dependencies. A solution this size will have incredible performance on just about any web host. A responsive and lightweight app will make users happy. The best part is, you now have a nice microblog to play with and take even further.
I’d love to read your comments and questions on the approach and hear what you think!

by: Guia Besana

by: Guia Besana

//

//