Monthly Archives: بهمن 1394

20+ Docs and Guides for Front-end Developers (No. 7)

As is often the case in front-end development, it seems we have so much to learn and so little time to do it. I’ve rounded up another 20+ learning resources, interactive playgrounds, and other goodies for front-end learning.

So please enjoy the seventh installment of our Docs and Guides series and don’t forget to let me know of any others that I haven’t yet included.

This is a site from the official Meteor development team, outlining opinions on best-practice application development targeted at intermediate JavaScript developers who are already familiar with Meteor.

Meteor: The Official Guide

Lists in grid format the names and descriptions of all HTML elements in the W3C and WHATWG specs. If you click an element, you’ll also see example code on how it can be used along with a link to the spec.

Gethtml

Maybe you’re like me and you’re tired of seeing so many ES6/ES2015 resources. Or maybe this is the one that you finally sit down with and it gets you over the hump of absorbing everything that’s new in the ECMAScript spec.

Learn ES2015

This one made the rounds a short time ago. If you haven’t seen it and want a fun way to study up on flexbox syntax, this is a very nicely done little interactive game/tutorial.

Flexbox Froggy

Nicolás Bevacqua’s study into JavaScript habits. This seems to be the first such survey that he’s conducted and he received an over 5,000 survey entries.

JavaScript Developer Survey Results

A simple interactive page to help you visualize how each flexbox feature works (flex-wrap, flex-direction, etc).

Flexbox.help

“This collection of information supports you to better find the best CDN for your content delivery needs.”

CDN Comparison

Part of the official Angular 2 docs, this is a one-stop developer guide with options to lookup syntax for JavaScript, TypeScript, and Dart.

Angular Cheat Sheet

More from Nicolás Bevacqua, this time it’s a visualization playground to help you learn JavaScript’s new promises feature. What’s great about this is the ability to step through the visualized code components with the option to save the animated visualization as a GIF.

Promisees

An interactive playground for learning CSS’s background-blend-mode and filter properties.

Filter Blend

This is similar to the previous site, this time it’s a playground to help you understand the mix-blend-mode property.

Mix-Blend-Mode CSS property test

A really nice little interactive tool to help you understand and visualize regular expressions. Includes a quick reference section, an explanation of the expression used, plus the ability to save the expression to a unique URL.

Regular Expressions 101

“A collection of working, practical examples of using service workers in modern web apps. Open your Developer Tools console to view fetch events and informative messages about what each recipe’s service worker is doing.”

ServiceWorker Cookbook

A lookup site to search for JavaScript libraries, frameworks, and plugins, filterable by categories including animation, DOM, forms, helpers, audio, video, and more.

JavaScripting

A set of guidelines for building more secure web properties, covering topics like SSL/TLS, Content Security Policy, cross-site scripting, cookie security, and more.

HTTP Security Best Practice

“A practical guide for developers on how to add accessibility information to HTML elements using the Accessible Rich Internet Applications specification [WAI-ARIA-1.1], which defines a way to make Web content and Web applications more accessible to people with disabilities.”

Notes on Using ARIA in HTML

“A searchable catalog of PostCSS plugins.” If you aren’t yet that familiar with the growing community around PostCSS, this might be a good way to learn about the kinds of plugins available.

PostCSS.parts

A Gist by Paul Irish that lists various front-end features that, when used in JavaScript, will trigger “reflow or layout thrashing”, which is a common performance bottleneck.

What forces layout / reflow

“A listing of every term defined by CSS specs.” Each item links to its place in the spec.

CSS Indexes

This is a question posed on the Q&A site Slant, showing multiple pros and cons, along with user comments, for lots of different IDEs and text editors.

What are the best JavaScript IDEs and editors?

Honorable Mentions…

Suggest Yours

Here are the previous 5 posts in this series:

If you’ve built or know of another learning resource for front-end developers, drop it in the comments and I’ll consider it for a future post.

Benefits of Cross-Functional Teams When Building Microservices

If you want your cross-functional teams to be successful, the first thing you need to do is to make sure that your organization can adapt. The software you create reinforces the culture of your company.

Agility is not the goal: it’s a method to solve a problem. Since the external environment can change faster than a company itself, it may need to change its pace as well. But it isn’t about sending out an email to all employees that the organization applies Scrum starting from next week: the transformation must happen on all levels. You need to make sure that there aren’t any roadblocks within your company that could slow down the speed of information. This applies to everything from feedback loops to knowledge centers that everyone can access, so they don’t need to spend time looking for the information they want to use.

Company culture must be prepared to support the transformation and adapt agile practices. Most people try to avoid being part of the ‘company transformation process’ since mass layoffs usually accompany it. Give people time to adapt and the resources to make it easier for them. Also, if you try to transform the middle managers into coaches first, they can support their colleagues well.

Functional vs cross-functional teams

A team completely owns a product during its whole lifetime. They don’t just create it, they are also responsible for maintaining it. This makes cross-functional teams perfect candidates for building microservices.

In project management, products are the formal definition of the project deliverables that make up or contribute to delivering the objectives of the project.

Separating teams by functions creates distance between them. If a separate QA team does the testing and developers are strictly focusing on writing code, they often don’t care much about testing and your product can end up with a lot of features that don’t work properly. A cross-functional team has individuals with different roles like database engineers, testers, infrastructure engineers, etc. As we can see from numerous examples (such as Amazon, Netflix, and Gilt for example), this can result in an excellent product that works as intended and the users love it.

Functional (or often called “siloed”) departments often adopt an “us vs. them” thinking against other teams. Instead of better productivity, this is more likely to result in hostility against each other. Working with people from different backgrounds also enables you to view the project from a different point of view. This helps understand the real reason behind a conflict and resolve (or even prevent) it.

Project: a piece of code that has to offer some predefined business value, must be handed over to the client, and is then periodically maintained by a team.

Cross-functional teams can ship code faster than functional teams because they can make their own decisions and work independently within an organization. The teams can focus on improving their cycle time and implement continuous deployment in order to solve the challenges they face almost instantly.

Teams can be formed by a manager or by the team itself. In both cases there is an important question that needs to be answered: how should people be grouped together? The two options are by similar function or by similar business.

Similar function

Grouping by similar function means that managers work with other managers, engineers with engineers, or marketers with fellow marketers. Melvin Conway’s law states that “Any organization that designs a system (defined broadly) will produce a design whose structure is a copy of the organization’s communication structure.” This is as true today as it was half a century ago. These are called functional units. They work the best if you can manage to hire the best people to build a superb team of specialists who are truly experts in their own field. The similar community enables them to learn from each other to master their job. The biggest challenge is that departments usually have difficulties when communicating with each other. For example, if the task of the UI team is to do an overhaul of the interface but the backend guys are still in the middle of something else, then the whole project will be delayed until the backend tasks are done - since the UI team can't even start the project.

Watch out for these signals. Constantly ordering work across capabilities, splitting stories between teams, having to move people around towards tasks, deploying in lock-step and fan-in for end-to-end testing all mean that Conway’s law is in effect in your organization.

Similar business

In this case, the people work together to deliver the same business value: a new feature a new project, or even a new product.

The teams need to be stable enough to get the job done and in exchange, they can move faster and more efficiently than teams grouped by similar functions. The communication is more likely to be oriented around the goal itself and not around the communication or management issues
across functional units, making this approach more efficient.

Challenges

Nearly 75% of cross-functional teams have challenges with at least three of the following five criteria, according to Harvard Business Review:

  • meeting a planned budget
  • staying on schedule
  • adhering to specifications
  • meeting customer expectations
  • maintaining alignment with the company’s corporate goals

The Kanban community points out that reorganizing already established teams can cost a lot more without having a system to organize the tasks for the teams. Before you decide to reorganize your whole company it may be worth to take a look at what already works and what doesn’t. If the not-so-optimal pace of the organization originates from the confused state of tasks on a low-level, then the reorganization itself won’t do much.

Building microservices

Microservices should be:

  • cheap to replace;
  • quick to scale;
  • fault tolerant;

Above all: they should allow you to go as fast as possible.

Siloed teams spend weeks with iterations. Because the teams build tightly coupled services, manual tests need to be performed at the same time for all services. This is far from going fast: the tests can often last for weeks.

The first steps towards cross-functional teams

When building microservices, teams can be organized around a single business purpose, and focus on continuous delivery to skip the long-lasting test periods.

Continuous delivery is a software development discipline where you build software in such a way that the software can be released to production at any time.

To achieve this, you need a collaborative working environment for everyone involved in delivery. This environment is the first step to have cross-functional teams.

What it means in practice: merge architects, testers, operations and development teams into a single (no bigger than 10-20 people) cross-functional team. This way, teams don’t have to pass a project around until they get the feedback they need, and delivering services don’t need to happen once in weeks.

James Lewis recommends using these best practices on the different levels within your organization:

  • Top-layer, at the line of business (across the whole company)
    • semantic versioning (define a major version of the software that every team can use within the company)
  • Value streams (group of teams within an organization that can deliver business value to the customer)
    • semantic versioning
    • consumer-driven contract testing
  • Inter-team layer (relationship between the individual teams)
    • tolerant reader
    • consumer-driven contract testing

How to make cross-functional teams efficient

To make cross-functional teams truly effective, they have to be able to operate independently. This way, the unit can complete a project or even a whole feature without requiring regular coordination or micromanagement. Of course, you need to know about what’s going on, but if the goals are clearly set, you don’t need to interfere, and all the tasks get done in time. There can be someone that reports to the VP’s or C-level executives, but the QA managers and the other mid-level managers are not a must anymore.

Constant re-evaluation assures that you’re making progress. If the market changes faster than a project develops, it may be necessary to kill it to save precious resources and divert them to another project that could achieve greater results within the same period. It’s not an easy thing to do, but it’s not worth to chase something into a dead end only to find out that you need to turn back.

The optimal size of a microservice is not necessarily ‘micro’. Amazon uses the size that a ‘two-pizza team’ (around a dozen people) can maintain, but there are setups where half a dozen people support half a dozen services. The concept of self-contained systems suggests using services larger than a microservice but still small enough to keep a team busy and provide meaningful value.

Netflix

Netflix decided to go with highly aligned and loosely coupled teams. The company set clear, specific, and broadly understood goals. The interactions between teams are focused on strategy and objectives, not tactics. Although it requires a large investment in management time to be transparent, they feel it was worth it.

Their teams try to keep meetings at the minimum. This is possible because the teams truly trust each other - without requiring layers of approvals. The leaders reach out proactively to help whenever they feel it’s appropriate and don’t focus on supervising each task of the team members.

Cisco

Cross-functional teams need a good project manager more than anything else. Cisco implemented a 3-layer structure: a group of specialists working on their tasks, a smaller core of people who communicate back to their teams and two vice presidents at the top. The conclusion was that every project should have an end-to-end leader who oversees the whole operation, and the individual teams should also have a leader as well. If the goals are clearly established, this setup helps to make sure that the teams won’t miss them.

Takeaways

  • The success with microservices isn’t just about using the right cloud service or container system. Organizations that embrace cross-functional teams can scale more quickly than a company with siloed teams trying to move to a microservice-based architecture. The key for that is effective communication: the right information goes to the right place at the right time.
  • Teams building microservices need sophisticated monitoring and logging setups for each service to keep track of both operational and business metrics. Trace allows you to measure both.
  • Conway’s law creates a loop: teams not just create a software that mirrors the structure of the organization, but it also reinforces the existing hierarchy.
  • Open source projects are a good example to follow: people work together from different functions towards a mutual goal. These projects also follow Conway’s law and become modular and easy to scale.

Our recently published report aims to address questions of Node.js adoption into enterprise organizations for cross-functional teams.


Unit Test Your JavaScript Using Mocha and Chai

This article was peer reviewed by Panayiotis «pvgr» Velisarakos, Mark Brown and Tom Greco. Thanks to all of SitePoint’s peer reviewers for making SitePoint content the best it can be!

Have you ever made some changes to your code, and later found it caused something else to break?

I’m sure most of us have. This is almost inevitable, especially when you have a larger amount of code. One thing depends on another, and then changing it breaks something else as a result.

But what if that didn’t happen? What if you had a way of knowing when something breaks as a result of some change? That would be pretty great. You could modify your code without having to worry about breaking anything, you’d have fewer bugs and you’d spend less time debugging.

That’s where unit tests shine. They will automatically detect any problems in the code for you. Make a change, run your tests and if anything breaks, you’ll immediately know what happened, where the problem is and what the correct behavior should be. This completely eliminates any guesswork!

In this article, I’ll show you how to get started unit testing your JavaScript code. The examples and techniques shown in this article can be applied to both browser-based code and Node.js code.

The code for this tutorial is available from our GitHub repo.

What Is Unit Testing

When you test your codebase, you take a piece of code — typically a function — and verify it behaves correctly in a specific situation. Unit testing is a structured and automated way of doing this. As a result, the more tests you write, the bigger the benefit you receive. You will also have a greater level of confidence in your codebase as you continue to develop it.

The core idea with unit testing is to test a function’s behavior when giving it a certain set of inputs. You call a function with certain parameters, and check you got the correct result.

// Given 1 and 10 as inputs...
var result = Math.max(1, 10);

// ...we should receive 10 as the output
if(result !== 10) {
  throw new Error('Failed');
}

In practice, tests can sometimes be more complex. For example, if your function makes an Ajax request, the test needs some more set up, but the same principle of “given certain inputs, we expect a specific outcome” still applies.

For this article, we’ll be using Mocha. It’s easy to get started with, can be used for both browser-based testing and Node.js testing, and it plays nicely with other testing tools.

The easiest way to install Mocha is through npm (for which we also need to install Node.js). If you’re unsure about how to install either npm or Node on your system, consult our tutorial: A Beginner’s Guide to npm — the Node Package Manager

With Node installed, open up a terminal or command line in your project’s directory.

  • If you want to test code in the browser, run npm install mocha chai --save-dev
  • If you want to test Node.js code, in addition to the above, run npm install -g mocha

This installs the packages mocha and chai. Mocha is the library that allows us to run tests, and Chai contains some helpful functions that we’ll use to verify our test results.

Testing on Node.js vs Testing in the Browser

The examples that follow are designed to work if running the tests in a browser. If you want to unit test your Node.js application, follow these steps.

  • For Node, you don’t need the test runner file.
  • To include Chai, add var chai = require('chai'); at the top of the test file.
  • Run the tests using the mocha command, instead of opening a browser.

Setting up a Directory Structure

You should put your tests in a separate directory from your main code files. This makes it easier to structure them, for example if you want to add other types of tests in the future (such as integration tests or functional tests).

The most popular practice with JavaScript code is to have a directory called test/ in your project’s root directory. Then, each test file is placed under test/someModuleTest.js. Optionally, you can also use directories inside test/, but I recommend keeping things simple — you can always change it later if necessary.

Setting up a Test Runner

In order to run our tests in a browser, we need to set up a simple HTML page to be our test runner page. The page loads Mocha, the testing libraries and our actual test files. To run the tests, we’ll simply open the runner in a browser.

If you’re using Node.js, you can skip this step. Node.js unit tests can be run using the command mocha, assuming you’ve followed the recommended directory structure.

Below is the code we’ll use for the test runner. I’ll save this file as testrunner.html.

<!DOCTYPE html>
<html>
  <head>
    <title>Mocha Tests</title>
    <link rel="stylesheet" href="node_modules/mocha/mocha.css">
  </head>
  <body>
    <div id="mocha"></div>
    <script src="node_modules/mocha/mocha.js"></script>
    <script src="node_modules/chai/chai.js"></script>
    <script>mocha.setup('bdd')</script>

    <!-- load code you want to test here -->

    <!-- load your test files here -->

    <script>
      mocha.run();
    </script>
  </body>
</html>

The important bits in the test runner are:

  • We load Mocha’s CSS styles to give our test results nice formatting.
  • We create a div with the ID mocha. This is where the test results are inserted.
  • We load Mocha and Chai. They are located in subfolders of the node_modules folder since we installed them via npm.
  • By calling mocha.setup, we make Mocha’s testing helpers available.
  • Then, we load the code we want to test and the test files. We don’t have anything here just yet.
  • Last, we call mocha.run to run the tests. Make sure you call this after loading the source and test files.

The Basic Test Building Blocks

Now that we can run tests, let’s start writing some.

We’ll begin by creating a new file test/arrayTest.js. An individual test file such as this one is known as a test case. I’m calling it arrayTest.js because for this example, we’ll be testing some basic array functionality.

Every test case file follows the same basic pattern. First, you have a describe block:

describe('Array', function() {
  // Further code for tests goes here
});

describe is used to group individual tests. The first parameter should indicate what we’re testing — in this case, since we’re going to test array functions, I’ve passed in the string 'Array'.

Secondly, inside the describe, we’ll have it blocks:

describe('Array', function() {
  it('should start empty', function() {
    // Test implementation goes here
  });

  // We can have more its here
});

it is used to create the actual tests. The first parameter to it should provide a human-readable description of the test. For example, we can read the above as “it should start empty”, which is a good description of how arrays should behave. The code to implement the test is then written inside the function passed to it.

All Mocha tests are built from these same building blocks, and they follow this same basic pattern.

  • First, we use describe to say what we’re testing – for example, “describe how array should work”.
  • Then, we use a number of it functions to create the individual tests – each it should explain one specific behavior, such as “it should start empty” for our array case above.

Writing the Test Code

Now that we know how to structure the test case, let’s jump into the fun part — implementing the test.

Since we are testing that an array should start empty, we need to create an array and then ensure it’s empty. The implementation for this test is quite simple:

var assert = chai.assert;

describe('Array', function() {
  it('should start empty', function() {
    var arr = [];

    assert.equal(arr.length, 0);
  });
});

Note on the first line, we set up the assert variable. This is just so we don’t need to keep typing chai.assert everywhere.

In the it function, we create an array and check its length. Although simple, this is a good example of how tests work.

First, you have something you’re testing — this is called the System Under Test or SUT. Then, if necessary, you do something with the SUT. In this test, we’re not doing anything, since we’re checking the array starts as empty.

The last thing in a test should be the validation — an assertion which checks the result. Here, we are using assert.equal to do this. Most assertion functions take parameters in the same order: First the “actual” value, and then the “expected” value.

  • The actual value is the result from your test code, so in this case arr.length
  • The expected value is what the result should be. Since an array should begin empty, the expected value in this test is 0

Chai also offers two different styles of writing assertions, but we’re using assert to keep things simple for now. When you become more experienced with writing tests, you might want to use the expect assertions instead, as they provide some more flexibility.

Running the Test

In order to run this test, we need to add it to the test runner file we created earlier.

If you’re using Node.js, you can skip this step, and use the command mocha to run the test. You’ll see the test results in the terminal.

Otherwise, to add this test to the runner, simply add:

<script src="test/arrayTest.js"></script>

Below:

<!-- load your test files here -->

Once you’ve added the script, you can then load the test runner page in your browser of choice.

The Test Results

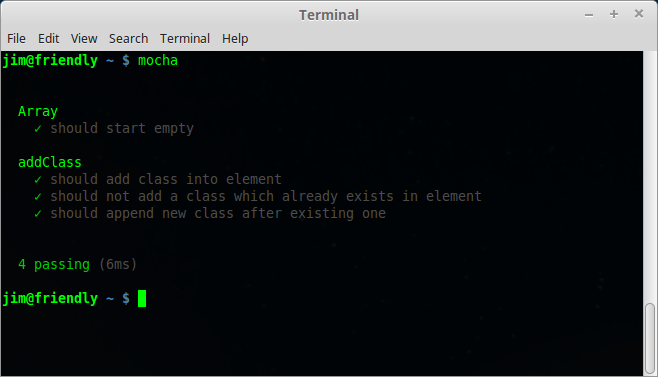
When you run your tests, the test results will look something like this:

Mocha test results - 1 test passing

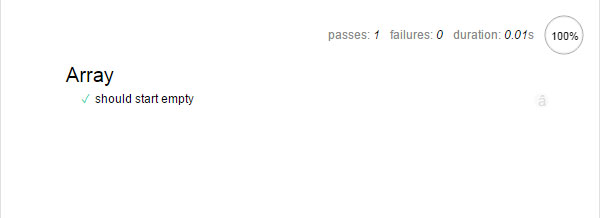
Note that what we entered into the describe and it functions show up in the output — the tests are grouped under the description. Note that it’s also possible to nest describe blocks to create further sub-groupings.

Let’s take a look at what a failing test looks like.

On the line in the test that says:

assert.equal(arr.length, 0);

Replace the number 0 with 1. This makes the test fail, as the array’s length no longer matches the expected value.

If you run the tests again, you’ll see the failing test in red with a description of what went wrong.

Mocha test error - one test failing

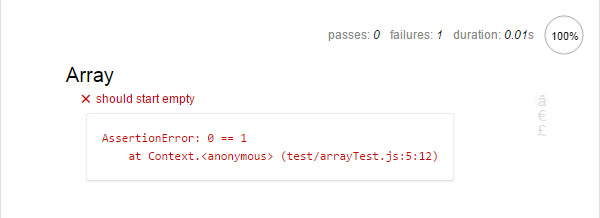
One of the benefits of tests is that they help you find bugs quicker, however this error is not very helpful in that respect. We can fix it though.

Most of the assertion functions can also take an optional message parameter. This is the message that is displayed when the assertion fails. It’s a good idea to use this parameter to make the error message easier to understand.

We can add a message to our assertion like so:

assert.equal(arr.length, 1, 'Array length was not 0');

If you re-run tests, the custom message will appear instead of the default.

Let’s switch the assertion back to the way it was — replace 1 with 0, and run the tests again to make sure they pass.

Putting It Together

So far we’ve looked at fairly simple examples. Let’s put what we’ve learned into practice and see how we would test a more realistic piece of code.

Here’s a function which adds a CSS class to an element. This should go in a new file js/className.js.

function addClass(el, newClass) {
  if(el.className.indexOf(newClass) === -1) {
    el.className += newClass;
  }
}

To make it a bit more interesting, I made it add a new class only when that class doesn’t exist in an element’s className property — who wants to see <div class="hello hello hello hello"> after all?

In the best case, we would write tests for this function before we write the code. But test-driven development is a complex topic, and for now we just want to focus on writing tests.

To get started, let’s recall the basic idea behind unit tests: We give the function certain inputs and then verify the function behaves as expected. So what are the inputs and behaviors for this function?

Given an element and a class name:

  • if the element’s className property does not contain the class name, it should be added.
  • if the element’s className property does contain the class name, it should not be added.

Let’s translate these cases into two tests. In the test directory, create a new file classNameTest.js and add the following:

describe('addClass', function() {
  it('should add class to element');
  it('should not add a class which already exists');
});

We changed the wording slightly to the “it should do X” form used with tests. This means that it reads a bit nicer, but is essentially still the same human-readable form we listed above. It’s usually not much more difficult than this to go from idea to test.

But wait, where are the test functions? Well, when we omit the second parameter to it, Mocha marks these tests as pending in the test results. This is a convenient way to set up a number of tests — kind of like a todo list of what you intend to write.

Let’s continue by implementing the first test.

describe('addClass', function() {
  it('should add class to element', function() {
    var element = { className: '' };

    addClass(element, 'test-class');

    assert.equal(element.className, 'test-class');
  });

  it('should not add a class which already exists');
});

In this test, we create an element variable and pass it as a parameter to the addClass function, along with a string test-class (the new class to add). Then, we check the class is included in the value using an assertion.

Again, we went from our initial idea — given an element and a class name, it should be added into the class list — and translated it into code in a fairly straightforward manner.

Although this function is designed to work with DOM elements, we’re using a plain JS object here. Sometimes we can make use of JavaScript’s dynamic nature in this fashion to simplify our tests. If we didn’t do this, we would need to create an actual element and it would complicate our test code. As an additional benefit, since we don’t use DOM, we can also run this test within Node.js if we so wish.

Running the Tests in the Browser

To run the test in the browser, you’ll need to add className.js and classNameTest.js to the runner:

<!-- load code you want to test here -->
<script src="js/className.js"></script>

<!-- load your test files here -->
<script src="test/classNameTest.js"></script>

You should now see one test pass and another test show up as pending, as is demonstrated by the following CodePen. Note that the code differs slightly from the example in order to make the code work within the CodePen environment.

See the Pen Unit Testing with Mocha (1) by SitePoint (@SitePoint) on CodePen.

Next, let’s implement the second test…

it('should not add a class which already exists', function() {
  var element = { className: 'exists' };

  addClass(element, 'exists');

  var numClasses = element.className.split(' ').length;
  assert.equal(numClasses, 1);
});

It’s a good habit to run your tests often, so let’s check what happens if we run the tests now. As expected, they should pass.

Here’s another CodePen with the second test implemented.

See the Pen Unit Testing with Mocha (2) by SitePoint (@SitePoint) on CodePen.

But hang on! I actually tricked you a bit. There is a third behavior for this function which we haven’t considered. There is also a bug in the function — a fairly serious one. It’s only a three line function but did you notice it?

Let’s write one more test for the third behavior which exposes the bug as a bonus.

it('should append new class after existing one', function() {
  var element = { className: 'exists' };

  addClass(element, 'new-class');

  var classes = element.className.split(' ');
  assert.equal(classes[1], 'new-class');
});

This time the test fails. You can see it in action in the following CodePen. The problem here is simple: CSS class names in elements should be separated by a space. However, our current implementation of addClass doesn’t add a space!

See the Pen Unit Testing with Mocha (3) by SitePoint (@SitePoint) on CodePen.

Let’s fix the function and make the test pass.

function addClass(el, newClass) {
  if(el.className.indexOf(newClass) !== -1) {
    return;
  }

  if(el.className !== '') {
    //ensure class names are separated by a space
    newClass = ' ' + newClass;
  }

  el.className += newClass;
}

And here’s a final CodePen with the fixed function and passing tests.

See the Pen Unit Testing with Mocha (4) by SitePoint (@SitePoint) on CodePen.

Running the Tests on Node

In Node, things are only visible to other things in the same file. As className.js and classNameTest.js are in different files, we need to find a way to expose one to the other. The standard way to do this is through the use of module.exports. If you need a refresher, you can read all about that here: Understanding module.exports and exports in Node.js

The code essentially stays the same, but is structured slightly differently:

// className.js

module.exports = {
  addClass: function(el, newClass) {
    if(el.className.indexOf(newClass) !== -1) {
      return;
    }

    if(el.className !== '') {
      //ensure class names are separated by a space
      newClass = ' ' + newClass;
    }

    el.className += newClass;
  }
}


// classNameTest.js

var chai = require('chai');
var assert = chai.assert;

var className = require('../js/className.js');
var addClass = className.addClass;

// The rest of the file remains the same

describe('addClass', function() {
  ...
});

And as you can see, the tests pass.

Mocha terminal output - 4 tests passing

What’s Next?

As you can see, testing does not have to be complicated or difficult. Just as with other aspects of writing JavaScript apps, you have some basic patterns which repeat. Once you get familiar with those, you can keep using them again and again.

But this is just scratching the surface. There’s a lot more to learn about unit testing.

  • Testing more complex systems
  • How to deal with Ajax, databases, and other “external” things?
  • Test-Driven Development

If you want to continue learning this and more, I’ve created a free JavaScript unit testing quickstart series. If you found this article useful, you should definitely check it out here.

20+ Docs and Guides for Front-end Developers (No. 7)

As is often the case in front-end development, it seems we have so much to learn and so little time to do it. I’ve rounded up another 20+ learning resources, interactive playgrounds, and other goodies for front-end learning.

So please enjoy the seventh installment of our Docs and Guides series and don’t forget to let me know of any others that I haven’t yet included.

This is a site from the official Meteor development team, outlining opinions on best-practice application development targeted at intermediate JavaScript developers who are already familiar with Meteor.

Meteor: The Official Guide

Lists in grid format the names and descriptions of all HTML elements in the W3C and WHATWG specs. If you click an element, you’ll also see example code on how it can be used along with a link to the spec.

Gethtml

Maybe you’re like me and you’re tired of seeing so many ES6/ES2015 resources. Or maybe this is the one that you finally sit down with and it gets you over the hump of absorbing everything that’s new in the ECMAScript spec.

Learn ES2015

This one made the rounds a short time ago. If you haven’t seen it and want a fun way to study up on flexbox syntax, this is a very nicely done little interactive game/tutorial.

Flexbox Froggy

Nicolás Bevacqua’s study into JavaScript habits. This seems to be the first such survey that he’s conducted and he received an over 5,000 survey entries.

JavaScript Developer Survey Results

A simple interactive page to help you visualize how each flexbox feature works (flex-wrap, flex-direction, etc).

Flexbox.help

“This collection of information supports you to better find the best CDN for your content delivery needs.”

CDN Comparison

Part of the official Angular 2 docs, this is a one-stop developer guide with options to lookup syntax for JavaScript, TypeScript, and Dart.

Angular Cheat Sheet

More from Nicolás Bevacqua, this time it’s a visualization playground to help you learn JavaScript’s new promises feature. What’s great about this is the ability to step through the visualized code components with the option to save the animated visualization as a GIF.

Promisees

An interactive playground for learning CSS’s background-blend-mode and filter properties.

Filter Blend

This is similar to the previous site, this time it’s a playground to help you understand the mix-blend-mode property.

Mix-Blend-Mode CSS property test

A really nice little interactive tool to help you understand and visualize regular expressions. Includes a quick reference section, an explanation of the expression used, plus the ability to save the expression to a unique URL.

Regular Expressions 101

“A collection of working, practical examples of using service workers in modern web apps. Open your Developer Tools console to view fetch events and informative messages about what each recipe’s service worker is doing.”

ServiceWorker Cookbook

A lookup site to search for JavaScript libraries, frameworks, and plugins, filterable by categories including animation, DOM, forms, helpers, audio, video, and more.

JavaScripting

A set of guidelines for building more secure web properties, covering topics like SSL/TLS, Content Security Policy, cross-site scripting, cookie security, and more.

HTTP Security Best Practice

“A practical guide for developers on how to add accessibility information to HTML elements using the Accessible Rich Internet Applications specification [WAI-ARIA-1.1], which defines a way to make Web content and Web applications more accessible to people with disabilities.”

Notes on Using ARIA in HTML

“A searchable catalog of PostCSS plugins.” If you aren’t yet that familiar with the growing community around PostCSS, this might be a good way to learn about the kinds of plugins available.

PostCSS.parts

A Gist by Paul Irish that lists various front-end features that, when used in JavaScript, will trigger “reflow or layout thrashing”, which is a common performance bottleneck.

What forces layout / reflow

“A listing of every term defined by CSS specs.” Each item links to its place in the spec.

CSS Indexes

This is a question posed on the Q&A site Slant, showing multiple pros and cons, along with user comments, for lots of different IDEs and text editors.

What are the best JavaScript IDEs and editors?

Honorable Mentions…

Suggest Yours

Here are the previous 5 posts in this series:

If you’ve built or know of another learning resource for front-end developers, drop it in the comments and I’ll consider it for a future post.